Ford Fiesta: Climate Control System - General Information / Refrigerant Identification Testing. General Procedures
Special Tool(s) / General Equipment
| Refrigerant Identification Equipment |
Activation
-
NOTE: Use Refrigerant Identification Equipment to identify gas samples taken directly from the refrigeration system or storage containers prior to recovering or charging the refrigerant system.
NOTE: Use Refrigerant Identification Equipment that conforms to SAE J1771 for R-134a or SAE J2912 standard identifies R-134a and R-1234yf.
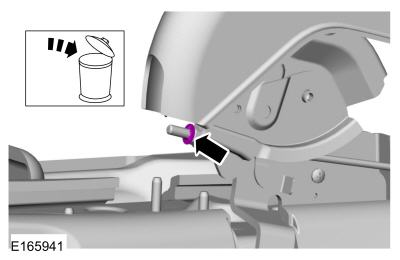
Follow the instructions included with Refrigerant Identification Equipment to obtain the sample for testing.
-
198‐RI2012yfp A/C Refrigerant Analyzer for use with R134a and R1234yf vehicles
Use the General Equipment: Refrigerant Identification Equipment
-
198‐RI2012yfp A/C Refrigerant Analyzer for use with R134a and R1234yf vehicles
-
NOTE: The refrigerant identifier displays one of the following:
-
If the purity level of R-134a is 98% or greater by weight, the green
PASS LED . The weight concentrations of R-134a, R-12, R-22, hydrocarbons
and air will be displayed on the digital display.
-
If refrigerant R-134a does not meet the 98% purity level, the red FAIL LED
and an alarm sounds alerting the user of potential hazards. The weight
concentrations of R-134a, R-12, R-22 and hydrocarbons are displayed on
the digital display.
-
If hydrocarbon concentrations are 2% or greater by weight, the red FAIL LED
, "Hydrocarbon High" will be displayed on the digital display, and an
alarm sounds alerting the user of potential hazards. The weight
concentrations of R-134a, R-12, R-22 and hydrocarbons also are displayed
on the digital display.
-
If the purity level of R-134a is 98% or greater by weight, the green
PASS LED . The weight concentrations of R-134a, R-12, R-22, hydrocarbons
and air will be displayed on the digital display.
-
The percentage of air contained in the sample is
displayed if the R-134a content is 98% or greater. The refrigerant
identifier eliminates the effect of air when determining the refrigerant
sample content because air is not considered a contaminant, although
air can affect A/C system
performance. When the refrigerant identifier has determined that a
refrigerant source is pure (R-134a is 98% or greater by weight) and air
concentration levels are 2% or greater by weight, it prompts the user if
an air purge is desired.
-
If contaminated refrigerant is detected, repeat the
refrigerant identification test to verify the refrigerant is indeed
contaminated.
-
NOTICE: If contaminated refrigerant is detected, DO NOT recover the refrigerant into R-134a recovery/recycling equipment. Recovery of contaminated refrigerant contaminates the recovered refrigerant supply and may damage the recovery/recycling equipment.
NOTE: Install a new suction accumulator, receiver drier or receiver drier element as directed by the A/C system flushing procedure.
Recover the contaminated refrigerant using suitable recovery-only equipment designed for capturing and storing contaminated refrigerant only.
-
Determine and correct the cause of the customer's initial concern.
-
Refer to Air Conditioning (A/C) System Flushing procedure in Group 412.
-
Dispose of the contaminated refrigerant in accordance with all federal, state and local regulations.
 Heater Core Leak Check. General Procedures
Inspection
NOTE:
A coolant leak in the heater hose could follow the
heater core tube to the heater core and appear as a leak in the heater
core...
 Refrigerant Oil Adding. General Procedures
Special Tool(s) /
General Equipment
Air Conditioning Service Unit
Refrigerant Oil Injector Set
Filling
Adjust the oil injector piston and fill the oil
injector with the correct amount of clean, new Motorcraft® PAG
Refrigerant Compressor Oil (YN-12-D)...
Other information:
Ford Fiesta 2014 - 2019 Service Manual: Parking Brake Cable Adjustment. General Procedures
Special Tool(s) / General Equipment 206-D002 (D81L-1103-A) Gauge, Brake Adjustment Adjustment Remove the floor console. Refer to: Floor Console (501-12 Instrument Panel and Console, Removal and Installation). Remove the parking brake cable adjustment lock nut...
Ford Fiesta 2014 - 2019 Service Manual: Seats. Diagnosis and Testing
DTC Chart: BCM Diagnostics in this manual assume a certain skill level and knowledge of Ford-specific diagnostic practices. REFER to: Diagnostic Methods (100-00 General Information, Description and Operation). BCM DTC Chart DTC Description Action B1034:12 Left Front Sea..
Categories
- Manuals Home
- Ford Fiesta Service Manual (2014 - 2019)
- Front Subframe. Removal and Installation
- Engine. Assembly
- Cylinder Head. Removal and Installation
- Jacking and Lifting - Overview. Description and Operation
- Maintenance Schedules
Parking Brake Control. Removal and Installation
Removal
NOTE: Removal steps in this procedure may contain installation details.
Remove the floor console.Refer to: Floor Console (501-12 Instrument Panel and Console, Removal and Installation).
Remove the driver seat.
Refer to: Front Seat (501-10 Seating, Removal and Installation).
Remove the parking brake cable adjustment lock nut.
 Loosen the parking brake cable adjustment nut.