Ford Fiesta: Exhaust System - 1.6L EcoBoost (132kW/180PS) – Sigma / Muffler and Tailpipe. Removal and Installation
Special Tool(s) / General Equipment
| Air Body Saw |
Removal
NOTICE: The production muffler and tailpipe assembly is one-piece construction. The service muffler and tailpipe is 2-piece construction. It is necessary to cut the production exhaust system to enable the service section(s) to be fitted. Before cutting any part of the exhaust system, check that the position of the cut is correct in comparison to the service sections to be installed.
NOTE: Service section part(s) use a service section clamp for assembly.
NOTE: Exhaust fasteners are of a torque prevailing design. Use only new fasteners with the same part number as the original. Torque values must be used as specified during reassembly to make sure of correct retention of exhaust components.
-
With the vehicle in NEUTRAL, position it on a hoist.
Refer to: Jacking and Lifting - Overview (100-02 Jacking and Lifting, Description and Operation).
-
If equipped.
Remove the 4 nuts and the brace.
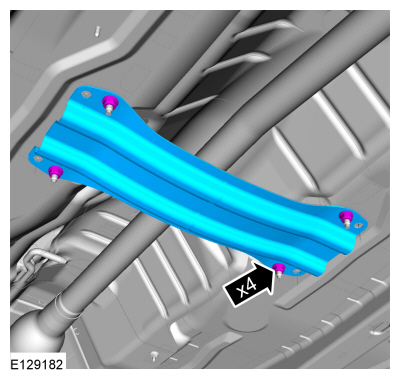 |
-
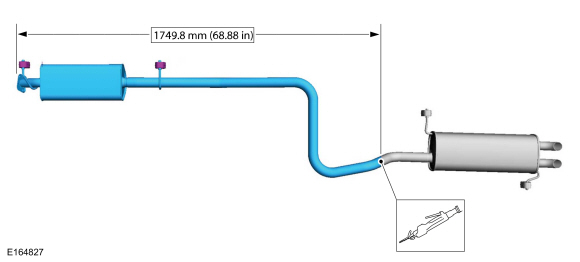
NOTICE: Do not forcibly bend or twist the exhaust flexible pipe. Failure to follow these instructions may cause damage to the flexible pipe.
NOTE: The 1.6L Duratec muffler and tailpipe assembly shown, 1.6L Ecoboost similar.
Carefully measure and cut the muffler and tailpipe where shown.
Use the General Equipment: Air Body Saw
 |
-
Detach the front muffler and tailpipe assembly isolators
and remove the 2 catalytic converter-to-muffler and tailpipe assembly
nuts. Remove the front muffler and tailpipe section.
-
Remove the front muffler and tailpipe section.
-
Discard the 2 nuts and gasket.
-
Detach the 2 isolators and remove the rear muffler and tailpipe section.
-
Remove the front muffler and tailpipe section.
 |
Installation
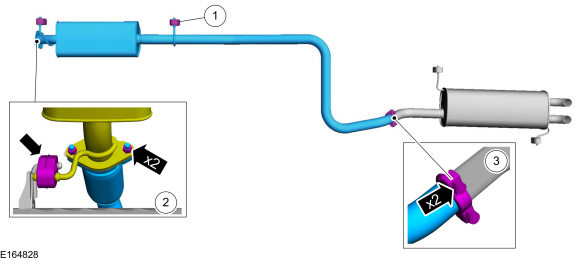
-
Install the rear muffler and tailpipe section and attach the 2 isolators.
-
NOTE: If the rear muffler and tailpipe section is being serviced, the rear muffler service part is sized to overlap the front muffler and tailpipe section (shown). If the front muffler and tailpipe section is being serviced, install the service sleeve and clamp.
NOTE: The 1.6L Duratec muffler and tailpipe assembly shown, 1.6L Ecoboost similar.
-
Attach the front muffler and tailpipe assembly isolators.
-
Install a new gasket and 2 new catalytic converter-to-muffler and tailpipe assembly nuts.
Torque: 35 lb.ft (48 Nm)
-
Install the service clamp.
Torque: 33 lb.ft (45 Nm)
-
Attach the front muffler and tailpipe assembly isolators.
 |
-
If equipped.
Install the 4 nuts and the brace.
Torque: 30 lb.ft (40 Nm)
|
 Catalytic Converter. Removal and Installation
Special Tool(s) /
General Equipment
Cable Ties
Removal
NOTE:
Exhaust fasteners are of a torque prevailing design. Use
only new fasteners with the same part number as the original...
 Fuel System
..
Other information:
Ford Fiesta 2014 - 2019 Service Manual: Windshield Reseal. General Procedures
Special Tool(s) / General Equipment Wooden Block Materials Name Specification Sika® SikaTack® MACH 60 / Sika® SikaTack® MACH 30 / Dow® BETASEAL™ Express - Sika Tack ASAP Urethane Adhesive - Motorcraft® Ultra-Clear Spray Glass CleanerZC-23 ESR-M14P5-A Repair Remove the interior rear view mi..
Ford Fiesta 2014 - 2019 Service Manual: Refrigerant Oil Adding. General Procedures
Special Tool(s) / General Equipment Air Conditioning Service Unit Refrigerant Oil Injector Set Filling Adjust the oil injector piston and fill the oil injector with the correct amount of clean, new Motorcraft® PAG Refrigerant Compressor Oil (YN-12-D). REFER to Refrigerant Oil Adding (when new components are installed) chart below for refrigerant oil a..
Categories
- Manuals Home
- Ford Fiesta Service Manual (2014 - 2019)
- Valve Clearance Adjustment. General Procedures
- Engine Component View. Description and Operation
- Front Suspension
- Manual Transmission, Clutch, Transfer Case and Power Transfer Unit
- Engine
Axle. Removal and Installation
Special Tool(s) / General Equipment
Flat Headed Screw Driver Transmission Jack Vehicle/Axle StandsRemoval
NOTICE: Suspension fasteners are critical parts that affect performance of vital components and systems. Failure of these fasteners may result in major service expense. Use the same or equivalent parts if replacement is necessary. Do not use a replacement part of lesser quality or substitute design. Tighten fasteners as specified.
Remove the floor console.Refer to: Floor Console (501-12 Instrum