Ford Fiesta: Clutch - 6-Speed Manual Transmission – B6 / Clutch. Diagnosis and Testing
Inspection and Verification
NOTICE: If transmission noise is reported, first check the transmission fluid level. The vehicle should not be driven if the transmission fluid level is low. A low transmission fluid level will damage the transmission.
NOTE: Before attempting to repair any concerns, road test the vehicle to determine which system the concern is in.
Gear driven units produce a certain level of noise. Some noise is acceptable and audible at certain speeds or under various driving conditions. Many conditions, such as road and weather, can amplify normal vehicle noise.
The following overview is a guide to diagnose a transmission or clutch concern:
- Check fluid level and condition.
- Evaluate the clutch hydraulic system.
- Evaluate the clutch.
- Inspect gearshift mechanism.
- Evaluate the transmission.
- Find the cause of the problem and correct it.
Verify Customer Concern
-
Verify and document the customer concern.
- During the customer interview, if a leak was noticed or if a leak is the concern, check the transmission fluid level. The vehicle should not be driven if the transmission fluid level is low.
- When was it first noticed?
- Did it appear suddenly or gradually?
- Did anything unusual occur that would coincide with it or precede it?
-
Identify when the condition occurs:
- Hot or cold vehicle operating conditions?
- Type of terrain?
- City/highway driving?
- Driving at a particular speed, coasting, hard acceleration?
- Shifting, upshifts, downshifts, in a particular gear, in all gears?
-
Has the transmission/clutch been repaired before or components installed?
- Check the vehicle service record. Note any repairs.
Check Fluid Level and Condition
NOTICE: The vehicle should not be driven if the transmission fluid level is low or damage may occur.
NOTICE: Excessive temperatures may break down the transmission lubricant. If there is reason to believe the transmission has been subjected to temperatures exceeding 135°C (275°F) for an extended period (greater than 20 minutes), change the lubricant immediately.
An
incorrect transmission fluid level may affect the transmission
operation and can result in transmission damage. For transmission
draining and filling,
REFER to: Transmission Fluid Level Check (308-03B Manual Transmission - 6-Speed Manual Transmission – B6, General Procedures).
A low transmission fluid level can result in poor transmission shifting, engagement or damage. It also indicates a leak in the transmission seals or gaskets.
-
Check the transmission fluid condition.
-
Allow the transmission fluid to drip onto a white cloth
and examine the stain. Check the transmission fluid for contamination or
metal particles.
-
Allow the transmission fluid to drip onto a white cloth
and examine the stain. Check the transmission fluid for contamination or
metal particles.
Evaluate Clutch Hydraulic System
-
Verify the clutch hydraulic fluid reservoir is filled to the correct level.
-
If the clutch hydraulic fluid level is correct, proceed to clutch check.
-
If the clutch hydraulic fluid level is low, add fluid as
necessary. Check the clutch hydraulic system for leaks and repair as
necessary.
-
If the clutch hydraulic fluid level is correct, proceed to clutch check.
Evaluate the Clutch
-
Apply and release the clutch pedal slowly to check pedal
binding. Make sure the clutch pedal can be fully applied and is not
restricted by the floor mat.
-
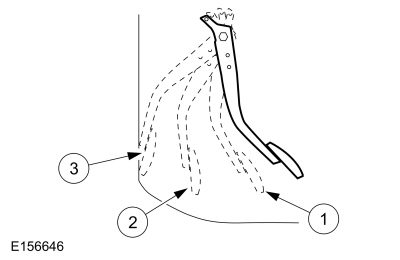
Measure the clutch reserve. GO to Pinpoint Test A
-
With the engine idling and the park brake applied, move the
gearshift lever into 4th gear. Increase engine speed to 2,000 rpm and
slowly release the clutch pedal.
-
If the engine stalls, the clutch is OK.
-
If the engine does not stall, the clutch is slipping. Repair as necessary.
-
If the engine stalls, the clutch is OK.
-
Compare the clutch evaluation results with the following
chart. The following list of conditions are typical clutch concerns.
Symptom Chart - Clutch Operation
Diagnostics
in this manual assume a certain skill level and knowledge of
Ford-specific diagnostic practices. For information about these
practices
REFER to: About this Manual (100-00 General Information, Description and Operation).
| Condition | Possible Sources | Actions |
|---|---|---|
| Clutch slippage |
|
GO to Pinpoint Test A |
| Clutch chatter, rattle or shudder |
|
GO to Pinpoint Test B |
| Clutch drag |
|
GO to Pinpoint Test C |
| Clutch pedal pulsation |
|
GO to Pinpoint Test B |
| Clutch related vibrations |
|
GO to Pinpoint Test B |
| Hard shifting |
|
GO to Pinpoint Test C |
| Boom noise while accelerating |
|
Accelerate the vehicle in the highest gear
from 1000 rpm to 2000 rpm at wide open throttle. If the boom noise is
noticeable during acceleration but it stops after the accelerator pedal
is released, remove the clutch and inspect the flywheel. REFER to: Clutch Disc and Pressure Plate (308-01B Clutch - 6-Speed Manual Transmission – B6, Removal and Installation). REFER to: Flywheel Inspection - 1.6L EcoBoost (132kW/180PS) – Sigma (303-00 Engine System - General Information, General Procedures). |
| Rattle/Harsh vibration while driving |
|
Gently accelerate the vehicle between idle
and 2000 rpm. If there is excessive rattle and harsh vibration, remove
the clutch and inspect the flywheel. REFER to: Clutch Disc and Pressure Plate (308-01B Clutch - 6-Speed Manual Transmission – B6, Removal and Installation). REFER to: Flywheel Inspection - 1.6L EcoBoost (132kW/180PS) – Sigma (303-00 Engine System - General Information, General Procedures). |
| Rattle at idle |
|
With the engine idling and the transmission
in NEUTRAL, slowly press the clutch. If an excessive gear rattle is
heard while cycling the clutch, remove the clutch and inspect the
flywheel. REFER to: Clutch Disc and Pressure Plate (308-01B Clutch - 6-Speed Manual Transmission – B6, Removal and Installation). REFER to: Flywheel Inspection - 1.6L EcoBoost (132kW/180PS) – Sigma (303-00 Engine System - General Information, General Procedures). |
| Rattle at Start up |
|
Start the engine with the transmission in
NEUTRAL. If an excessive gear rattle is heard during start-up, remove
the clutch and inspect the flywheel. REFER to: Clutch Disc and Pressure Plate (308-01B Clutch - 6-Speed Manual Transmission – B6, Removal and Installation). REFER to: Flywheel Inspection - 1.6L EcoBoost (132kW/180PS) – Sigma (303-00 Engine System - General Information, General Procedures). |
| Rattle at shut down |
|
With the engine running and the transmission
in NEUTRAL, turn the ignition to the OFF position. If a harsh metallic
noise is heard during the last revolutions just before the engine stops,
remove the clutch and inspect the flywheel. REFER to: Clutch Disc and Pressure Plate (308-01B Clutch - 6-Speed Manual Transmission – B6, Removal and Installation). REFER to: Flywheel Inspection - 1.6L EcoBoost (132kW/180PS) – Sigma (303-00 Engine System - General Information, General Procedures). |
Pinpoint Test(s)
PINPOINT TEST A: CLUTCH SLIPPAGE
| A1 TEST CLUTCH SLIPPAGE | ||||||||||||
Does the engine stall when the clutch pedal is fully released?
|
||||||||||||
| A2 MEASURE THE CLUTCH RESERVE | ||||||||||||
|
NOTE: If equipped, remove the floor mat to allow the clutch pedal to travel to the downstop.
Is the clutch reserve between 0.0394 in ( 1 mm)– 0.1181 in ( 3 mm).
|
| B1 CHECK THE ENGINE OR TRANSMISSION MOUNTS | ||||
Are any of the engine or transmission mounts loose or damaged?
|
||||
| B2 INSPECT THE PRESSURE PLATE BOLTS | ||||
Are any of the pressure plate-to-flywheel bolts loose?
|
||||
| B3 INSPECT THE PRESSURE PLATE | ||||
Are any signs of damage present on the clutch pressure plate?
|
||||
| B4 CHECK THE CLUTCH DISC | ||||
Is the clutch disc OK?
|
||||
| B5 INSPECT THE FLYWHEEL | ||||
Is the flywheel OK?
|
||||
| B6 INSPECT THE INPUT SHAFT | ||||
Are any signs of wear damage, or corrosion present on the input shaft?
|
| C1 CHECK CLUTCH FLUID LEVEL | ||||
Is the clutch fluid level between the MAX and MIN marks on the brake fluid reservoir?
|
||||
| C2 TEST CLUTCH PEDAL FREE TRAVEL | ||||
Is the measured dimension within 0.0394 in ( 1 mm)– 0.3150 in ( 8 mm)?
|
||||
| C3 CHECK THE BELLEVILLE SPRING WASHER OF THE CLUTCH PRESSURE PLATE | ||||
Does the clutch pressure plate or the Belleville spring washer of the clutch pressure plate show signs of wear or damage?
|
COMPONENT TEST(S)
Clutch
-
Slowly press and release the clutch pedal to see if the
pedal is binding. Make sure the clutch pedal can be fully pressed and is
not restricted by the floor mat. Verify the pedal return spring is
present and is functioning correctly.
-
Measure the clutch reserve. GO to Pinpoint Test A
-
With the engine idling, the parking brake on and the
clutch pedal up, gently move the gearshift lever into a forward or
reverse gear, until gear clash can be heard. Slowly press the clutch
pedal.
-
If the gears cease to clash (full disengage at 25.4 mm
(1 in) to 38.1 mm (1.5 in) from the floor), hold the clutch pedal at the
point of disengagement and increase engine speed to 4,000 rpm. The
clutch should remain disengaged, clutch OK.
-
Any concerns indicate a worn or damaged clutch. Repair as necessary.
-
With the engine idling, move the gearshift lever into
4th gear. Increase the engine to 2,000 rpm and slowly release the clutch
pedal.
-
If the engine stalls, the clutch is OK.
-
If the engine does not stall, the clutch is slipping. Repair as necessary.
-
Compare the road test results with the symptom chart.
The chart is a list of conditions that are typical faults.
REFER to: Clutch (308-01B Clutch - 6-Speed Manual Transmission – B6, Diagnosis and Testing).
 Clutch Disc and Pressure Plate. Removal and Installation
Removal
Remove the transmission.
Refer to: Transmission (308-03B Manual Transmission - 6-Speed Manual Transmission – B6, Removal).
Loosen each bolt 2 turns at a time until all bolts are removed...
Other information:
Ford Fiesta 2014 - 2019 Service Manual: Front Subframe. Removal and Installation
Special Tool(s) / General Equipment 300-OTC1585AEPowertrain Lift Tie Rod End Remover Wooden Block Removal WARNING: Before beginning any service procedure in this section, refer to Safety Warnings in section 100-00 General Information...
Ford Fiesta 2014 - 2019 Service Manual: Wheel Studs - 1.6L EcoBoost (132kW/180PS) – Sigma. Removal and Installation
Special Tool(s) / General Equipment 211-001 (TOOL-3290-D) Remover, Tie-Rod End Removal NOTICE: Suspension fasteners are critical parts that affect performance of vital components and systems. Failure of these fasteners may result in major service expense...
Categories
- Manuals Home
- Ford Fiesta Service Manual (2014 - 2019)
- Service Information
- Fuel Pump. Removal and Installation
- Timing Belt. Removal and Installation
- Manual Transmission - 6-Speed Manual Transmission – B6
- Fuel Rail. Removal and Installation
Parking Brake Control. Removal and Installation
Removal
NOTE: Removal steps in this procedure may contain installation details.
Remove the floor console.Refer to: Floor Console (501-12 Instrument Panel and Console, Removal and Installation).
Remove the driver seat.
Refer to: Front Seat (501-10 Seating, Removal and Installation).
Remove the parking brake cable adjustment lock nut.
 Loosen the parking brake cable adjustment nut.


