Ford Fiesta: Brake System - General Information / Brake System. Diagnosis and Testing
Symptom Chart(s)
Symptom Chart: Brake System
Diagnostics in this manual assume a certain skill level and knowledge of Ford-specific diagnostic practices.
REFER to: Diagnostic Methods (100-00 General Information, Description and Operation).
| Condition | Possible Sources | Actions |
|---|---|---|
| The red brake warning indicator and the yellow ABS warning indicator are illuminated | Diagnostic Trouble Codes (DTCs) in the ABS |
CHECK for ABS diagnostic trouble codes (DTCs). REFER to: Anti-Lock Brake System (ABS) and Stability Control (206-09 Anti-Lock Brake System (ABS) and Stability Control, Diagnosis and Testing). |
| The red brake warning indicator is always/never on |
|
REFER to: Instrumentation, Message Center and Warning Chimes (413-01 Instrumentation, Message Center and Warning Chimes, Diagnosis and Testing). |
| Vehicle pulls or drifts during braking |
|
INSPECT the brake system components. REFER to: Brake System Inspection (206-00 Brake System - General Information, General Procedures). INSTALL new components as necessary. |
| Tires |
REFER to: Wheels and Tires (204-04A Wheels and Tires, Diagnosis and Testing). |
|
| Suspension component(s) and/or wheel alignment |
REFER to: Suspension System (204-00 Suspension System - General Information, Diagnosis and Testing). |
|
| Brake pedal goes down fast or eases down slowly | Brake fluid leaks and/or air in the system |
INSPECT the system for leaks. REPAIR as necessary. BLEED the system. REFER to: Brake System Pressure Bleeding (206-00 Brake System - General Information, General Procedures). |
| Brake master cylinder | CARRY OUT the Brake Master Cylinder - Bypass Condition Component Test. | |
| HCU |
REFER to: Anti-Lock Brake System (ABS) and Stability Control (206-09 Anti-Lock Brake System (ABS) and Stability Control, Diagnosis and Testing). |
|
| Brakes lock up under light brake pedal force |
|
INSPECT the brake system components. REFER to: Brake System Inspection (206-00 Brake System - General Information, General Procedures). INSTALL new components as necessary. |
| ABS |
REFER to: Anti-Lock Brake System (ABS) and Stability Control (206-09 Anti-Lock Brake System (ABS) and Stability Control, Diagnosis and Testing). |
|
| Excessive brake pedal travel (low/spongy pedal) | Brake fluid leaks and/or air in the system |
INSPECT the system for leaks. REPAIR as necessary. BLEED the system. REFER to: Brake System Pressure Bleeding (206-00 Brake System - General Information, General Procedures). |
| Incorrect brake shoe adjustment |
REFER to: Brake Shoe Adjustment (206-02 Drum Brake, General Procedures). |
|
| Brake master cylinder | CARRY OUT the Brake Master Cylinder - Bypass Condition Component Test. | |
| Brake calipers and/or guide pins |
INSPECT the brake calipers and guide pins. REFER to: Brake System Inspection (206-00 Brake System - General Information, General Procedures). INSTALL new components as necessary. |
|
| Brake flexible hose |
INSPECT the brake flexible hoses during
brake application. INSTALL a new brake hose as necessary. REFER to: Front Brake Flexible Hose (206-03 Front Disc Brake, Removal and Installation). REFER to: Rear Brake Flexible Hose (206-04 Rear Disc Brake, Removal and Installation). |
|
| Erratic brake pedal travel | Brake pedal |
INSPECT the brake pedal for binding,
obstructions and correct interface to booster rod. REPAIR as necessary.
CHECK the brake pedal fasteners for correct torque. REFER to: Brake Pedal and Bracket (206-06 Hydraulic Brake Actuation, Removal and Installation). |
| ABS |
REFER to: Anti-Lock Brake System (ABS) and Stability Control (206-09 Anti-Lock Brake System (ABS) and Stability Control, Diagnosis and Testing). |
|
| Brake drag | Parking brake component |
INSPECT the parking brake system. REFER to: Parking Brake (206-05 Parking Brake and Actuation, Diagnosis and Testing). |
|
INSPECT the brake system components. REFER to: Brake System Inspection (206-00 Brake System - General Information, General Procedures). INSTALL new components as necessary. |
|
| Brake master cylinder | CARRY OUT the Brake Master Cylinder - Compensator Port Component Test. | |
| Hydraulic Control Unit (HCU) |
REFER to: Anti-Lock Brake System (ABS) and Stability Control (206-09 Anti-Lock Brake System (ABS) and Stability Control, Diagnosis and Testing). |
|
| Stoplamp switch |
VERIFY correct installation of the stoplamp switch. REFER to: Stoplamp Switch (417-01 Exterior Lighting, Removal and Installation). |
|
| Excessive brake pedal effort |
|
CARRY OUT the Brake Booster Component Test in this section. |
| Brake pads/shoes |
INSPECT the brake pads. INSTALL new components as necessary. REFER to: Brake System Inspection (206-00 Brake System - General Information, General Procedures). |
Symptom Chart: NVH
Diagnostics in this manual assume a certain skill level and knowledge of Ford-specific diagnostic practices.
REFER to: Diagnostic Methods (100-00 General Information, Description and Operation).
| Condition | Possible Sources | Actions |
|---|---|---|
| Vibration when the brakes are applied |
|
GO to Pinpoint Test A |
| Brake vibration/shudder occurs when the brake pedal is released | Brake drag | REFER to Symptom Chart: Brake System |
| Rattling noise |
|
|
| Squealing noise - occurs on first (morning) brake application | Brake pads/shoes | Acceptable condition. Caused by humidity and low brake pad temperature. |
| Squealing noise - a continuous squeal | Brake pads/shoes |
INSPECT the brake pads. INSTALL new components as necessary. REFER to: Brake Pads (206-03 Front Disc Brake, Removal and Installation). REFER to: Brake Pads (206-04 Rear Disc Brake, Removal and Installation). |
| Squealing noise - an intermittent squeal | Brake pads/shoes | Acceptable condition. Caused by cold, heat, water, mud or snow. |
| Groaning noise - occurs at low speeds with brake lightly applied (creeping) | Brake pads/shoes | Acceptable condition. |
| Grinding/moaning noise - continuous |
|
INSPECT the brake pads, brake shoes,
brake discs and attaching hardware for damage. VERIFY brake components
are within specifications. REFER to: Brake Pads (206-04 Rear Disc Brake, Removal and Installation). INSTALL new components as necessary. |
Pinpoint Tests
Diagnostics in this manual assume a certain skill level and knowledge of Ford-specific diagnostic practices.
REFER to: Diagnostic Methods (100-00 General Information, Description and Operation).
Vibration When Brakes Are Applied
Normal Operation and Fault Conditions
During moderate to heavy braking, noise from the HCU and pulsation in the brake pedal can be observed. Pedal pulsation coupled with noise during heavy braking or on loose gravel, bumps, wet or snowy surfaces is acceptable and indicates correct functioning of the ABS . Pedal pulsation or steering wheel nibble when the brakes are applied (frequency is proportioned to the vehicle speed) indicates a concern with a brake or suspension component.
PINPOINT TEST A: VIBRATION WHEN BRAKES ARE APPLIED
| A1 ROAD TEST THE VEHICLE -LIGHT BRAKING | ||||
Is there a vibration/shudder felt in the steering wheel, seat or brake pedal?
|
||||
| A2 ROAD TEST THE VEHICLE -MODERATE TO HEAVY BRAKING | ||||
Is there a vibration/shudder?
|
||||
| A3 CHECK ABS (ANTI-LOCK BRAKE SYSTEM) OPERATION | ||||
|
NOTE: During moderate to heavy braking, noise from the Hydraulic Control Unit (HCU) and pulsation in the brake pedal can be observed. Pedal pulsation coupled with noise during heavy braking or on loose gravel, bumps, wet or snowy surfaces is acceptable and indicates correct operation of the ABS . Pedal pulsation or steering wheel nibble with the frequency proportional to vehicle speed indicates a concern with a brake or suspension component.
Is the vibration/shudder only present on a wet, snowy or loose surface?
|
||||
| A4 ISOLATE BRAKE VIBRATION | ||||
|
NOTE: This test step is not applicable to vehicles with drum-in-hat type parking brakes. For vehicles with drum-in-hat parking brakes, proceed to the next test step. For all other vehicles, apply the parking brake to identify if the problem is in the front or rear brake.
Is there a vibration/shudder?
|
||||
| A5 CHECK THE FRONT SUSPENSION | ||||
Are all the suspension components in satisfactory condition?
|
||||
| A6 CHECK THE FRONT BRAKE DISCS | ||||
Is the vibration/shudder present?
|
||||
| A7 CHECK THE REAR SUSPENSION | ||||
Are all the suspension components in satisfactory condition?
|
Component Test- Brake Booster
-
Disconnect the brake booster vacuum sensor/check valve from
the brake booster and connect a suitable vacuum/pressure tester to the
booster side of the vacuum sensor/check valve.
-
Apply the parking brake, start the engine and place the transmission in NEUTRAL.
-
Allow the engine to reach normal operating temperature.
-
Allow the engine to reach normal operating temperature.
-
Verify that vacuum is available at the vacuum sensor/check valve with engine running at normal idle speed.
-
The vacuum gauge should read between 51-74 kPa (15-22 in-Hg).
-
If specified vacuum is available, stop the engine,
connect the vacuum sensor/check valve and continue with Step 5.
-
If specified vacuum is not available, continue with Step 4.
-
The vacuum gauge should read between 51-74 kPa (15-22 in-Hg).
-
Disconnect the vacuum sensor/check valve from the vacuum
hose and verify that the specified vacuum is available at the hose with
the engine at idle speed and the transmission in NEUTRAL.
-
If specified vacuum is available, stop the engine, install a new check valve and continue with Step 5.
-
For vehicles equipped with a brake vacuum pump, if
specified vacuum is not available, inspect the vacuum hose and install
new as necessary. If the vacuum hose is OK, install a new vacuum pump.
REFER to: Brake Vacuum Pump - 1.6L EcoBoost (132kW/180PS) – Sigma (206-07 Power Brake Actuation, Removal and Installation).
-
For vehicles not equipped with a brake vacuum pump, if
specified vacuum is not available, stop the engine, connect the vacuum
hose to the check valve and diagnose the no/low vacuum condition.
REFER to: Engine (303-00 Engine System - General Information, Diagnosis and Testing).
-
If specified vacuum is available, stop the engine, install a new check valve and continue with Step 5.
-
Apply the brake pedal several times to exhaust all vacuum from the system.
-
Apply the brake pedal and hold it in the applied position.
Start the engine and verify that the brake pedal moves downward after
the engine starts.
-
If the brake pedal moves, the brake booster is operating correctly.
-
If the brake pedal does not move, install a new brake booster.
REFER to: Brake Booster (206-07 Power Brake Actuation, Removal and Installation).
-
If the brake pedal moves, the brake booster is operating correctly.
-
Operate the engine a minimum of 20 seconds at idle. Stop the
engine and let the vehicle stand for 10 minutes, then apply the brake
pedal. The brake pedal feel should be the same as that noted with the
engine operating.
-
If the brake pedal feels hard (no power assist), install
a new brake booster vacuum sensor/check valve and retest.
-
If condition still exists, install a new brake booster.
REFER to: Brake Booster (206-07 Power Brake Actuation, Removal and Installation).
-
If the brake pedal feels the same as noted with the
engine operating, the vacuum sensor/check valve is functioning properly.
-
If the brake pedal feels hard (no power assist), install
a new brake booster vacuum sensor/check valve and retest.
Component Test- Brake Master Cylinder - Bypass Condition
-
Inspect the master cylinder.
-
Disconnect the brake tubes from the master cylinder.
-
NOTE: Make sure the outlet port plugs do not show signs of leakage.
Plug the outlet ports of the master cylinder.
-
Lightly apply the brakes and hold for 10 seconds. Release
the brakes and then reapply with heavy force. If brake pedal height
cannot be maintained, the brake master cylinder has an internal leak and
a new brake master cylinder must be installed.
-
If brake pedal height is maintained, reinstall brake tubes and tighten to specifications.
REFER to: Brake Master Cylinder (206-06 Hydraulic Brake Actuation, Removal and Installation).
After installation, bleed the brake system.REFER to: Brake System Pressure Bleeding (206-00 Brake System - General Information, General Procedures).
Component Test- Brake Master Cylinder - Compensator Port
-
Inspect the master cylinder.
-
REFER to: Jacking and Lifting - Overview (100-02 Jacking and Lifting, Description and Operation).
-
Apply and release the brakes.
-
With the brakes released, attempt to rotate each wheel and check for any brake drag.
- If an excessive amount of brake drag exists at multiple wheels, continue to Step 5.
- If an excessive amount of brake drag exists at only one wheel, it indicates a possible seized brake caliper, brake wheel cylinder or parking brake component. Repair or install new components as necessary.
-
Check the brake stoplamp switch and the brake pedal free play to verify the brake pedal is not partially applied.
-
Loosen the brake master cylinder nuts and position the brake master cylinder away from the brake booster.
-
With the brakes released, attempt to rotate each wheel and check for any brake drag.
-
If the brake drag is no longer present, install a new brake booster.
REFER to: Brake Booster (206-07 Power Brake Actuation, Removal and Installation).
-
If the brake drag is still present, install a new master cylinder.
REFER to: Brake Master Cylinder (206-06 Hydraulic Brake Actuation, Removal and Installation).

 Component Bleeding. General Procedures
Special Tool(s) /
General Equipment
Master Cylinder Bleeding Set
Bleeding
NOTICE:
If the fluid is spilled on the paintwork, the affected area must be immediately washed down with cold water...
Other information:
Ford Fiesta 2014 - 2019 Service Manual: Air Conditioning (A/C) Compressor Leak Detection. General Procedures
Special Tool(s) / General Equipment Air Conditioning Service Unit Electronic Leak Detector Air Conditioning Adaptor Kit Leak detection Recover the refrigerant. Refer to Air Conditioning (A/C) System Recovery, Evacuation and Charging procedure in Group 412...
Ford Fiesta 2014 - 2019 Service Manual: Engine. Description and Operation
Overview The 1.6L GTDI 4-cylinder engine has the following features: Dual overhead camshafts Four valves per cylinder Composite intake manifold Aluminum cylinder head Aluminum cylinder block Gasoline turbocharged direct injection (GTDI) Twin independent variable cam timing (Ti-VCT) Engine Identification Always refer to these ..
Categories
- Manuals Home
- Ford Fiesta Service Manual (2014 - 2019)
- Manual Transmission - 6-Speed Manual Transmission – B6
- Engine - 1.6L EcoBoost (132kW/180PS) – Sigma
- Front Subframe. Removal and Installation
- Fuel Pump. Removal and Installation
- Engine. Assembly
Brake Backing Plate. Removal and Installation
Removal
NOTE: Removal steps in this procedure may contain installation details.
Remove the brake shoes.Refer to: Brake Shoes (206-02 Drum Brake, Removal and Installation).
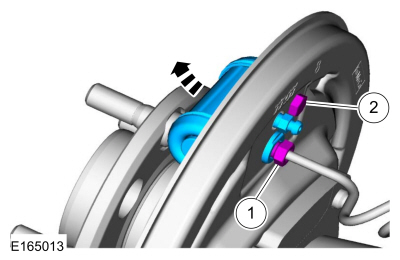
Disconnect the brake tube fitting.
Torque: 159 lb.in (18 Nm) Remove the bolt and wheel cylinder.
Torque: 106 lb.in (12 Nm)
 Disconnect the brake shoe lever fitting and re