Ford Fiesta: Engine Cooling - 1.6L EcoBoost (132kW/180PS) – Sigma / Block Heater. Removal and Installation
Ford Fiesta 2014 - 2019 Service Manual / Engine / Engine Cooling - 1.6L EcoBoost (132kW/180PS) – Sigma / Block Heater. Removal and Installation
Materials
| Name | Specification |
|---|---|
| Motorcraft® Metal Surface Prep Wipes ZC-31-B |
- |
Removal
NOTE: Removal steps in this procedure may contain installation details.
-
Drain the cooling system.
Refer to: Engine Cooling System Draining, Vacuum Filling and Bleeding (303-03B Engine Cooling - 1.6L EcoBoost (132kW/180PS) – Sigma, General Procedures).
-
Remove the catalytic converter.
Refer to: Catalytic Converter (309-00B Exhaust System - 1.6L EcoBoost (132kW/180PS) – Sigma, Removal and Installation).
-
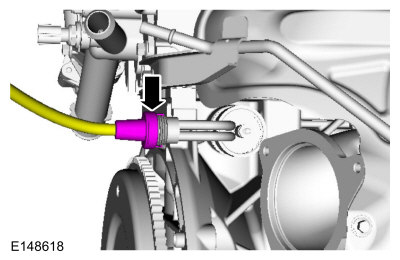
NOTICE: Make sure the block heater wiring is routed and secured away from rotating or hot components.
Disconnect the block heater electrical connector.
 |
-
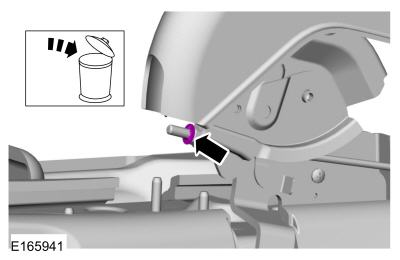
Remove the block heater locking nut and the block heater.
 |
Installation
-
Inspect the sealing surfaces and clean with metal surface prep wipes.
Material: Motorcraft® Metal Surface Prep Wipes / ZC-31-B
 |
-
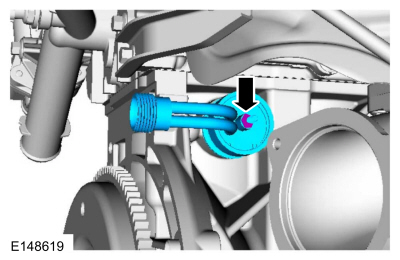
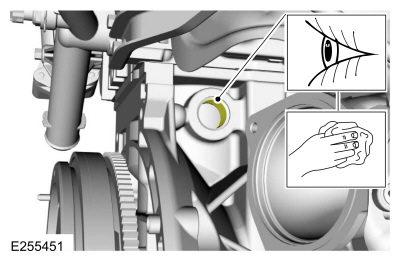
Position the block heater and finger-tighten the nut,
making sure the block heater electrical connector points to the 9
o'clock position.
|
-
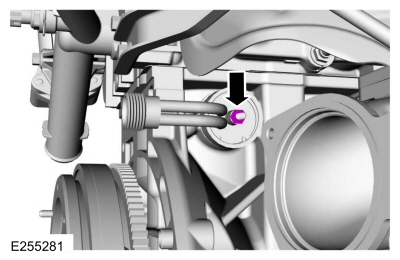
Tighten the block heater nut.
Torque: 27 lb.in (3 Nm)
 |
-
NOTICE: Route the block heater power cable away from hot or rotating components, or the cable can be damaged.
Connect the electrical connector.
|
-
Install the catalytic converter.
Refer to: Catalytic Converter (309-00B Exhaust System - 1.6L EcoBoost (132kW/180PS) – Sigma, Removal and Installation).
-
Fill and bleed the cooling system.
Refer to: Engine Cooling System Draining, Vacuum Filling and Bleeding (303-03B Engine Cooling - 1.6L EcoBoost (132kW/180PS) – Sigma, General Procedures).

 Coolant Bypass Solenoid Valve. Removal and Installation
Special Tool(s) /
General Equipment
Hose Clamp Remover/Installer
Removal
NOTE:
Removal steps in this procedure may contain installation details...
Other information:
Ford Fiesta 2014 - 2019 Service Manual: Front Wheel Speed Sensor. Removal and Installation
Removal NOTE: Removal steps in this procedure may contain installation details. Remove the wheel and tire. Refer to: Wheel and Tire (204-04A Wheels and Tires, Removal and Installation). Remove the retainers...
Ford Fiesta 2014 - 2019 Service Manual: Pyrotechnic Device Disposal. General Procedures
Disposal Disposal of Deployable Devices and Pyrotechnic Devices That Are Undeployed-Inoperative NOTE: All inoperative airbags, seatbelt pretensioners and inflatable seatbelt inflators have been placed on the Mandatory Return List. Treat all discolored or damaged airbags the same as any inoperative live airbag being returned...
Categories
- Manuals Home
- Ford Fiesta Service Manual (2014 - 2019)
- Maintenance Schedules
- Engine Component View. Description and Operation
- Fuel Pump. Removal and Installation
- Manual Transmission, Clutch, Transfer Case and Power Transfer Unit
- Transmission Fluid Level Check. General Procedures
Parking Brake Control. Removal and Installation
Removal
NOTE: Removal steps in this procedure may contain installation details.
Remove the floor console.Refer to: Floor Console (501-12 Instrument Panel and Console, Removal and Installation).
Remove the driver seat.
Refer to: Front Seat (501-10 Seating, Removal and Installation).
Remove the parking brake cable adjustment lock nut.
 Loosen the parking brake cable adjustment nut.
Copyright © 2025 www.fofiesta7.com