Ford Fiesta: Manual Transmission - 6-Speed Manual Transmission – B6 / Transmission. Installation
Special Tool(s) /
General Equipment
 |
205-115A
(205-115)
Installer, Drive Pinion Seal |
| Transmission Jack |
| Retaining Strap |
| Wooden Block |
Materials
| Name |
Specification |
Motorcraft® High Temperature 4x4 Front Axle and Wheel Bearing Grease
XG-11 |
WSS-M1C267-A1
|
-
Apply a thin coating of grease on the input shaft.
Material: Motorcraft® High Temperature 4x4 Front Axle and Wheel Bearing Grease
/ XG-11
(WSS-M1C267-A1)
-
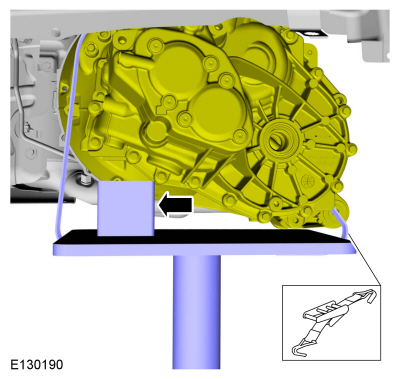
Install the following items:
-
Use the General Equipment: Wooden Block
-
Use the General Equipment: Transmission Jack
-
Use the General Equipment: Retaining Strap
-
Install the transmission on the dowel pins and install the bellhousing bolts.
Torque:
35 lb.ft (48 Nm)
-
Remove the following items:
-
Use the General Equipment: Retaining Strap
-
Use the General Equipment: Transmission Jack
-
Use the General Equipment: Wooden Block
-
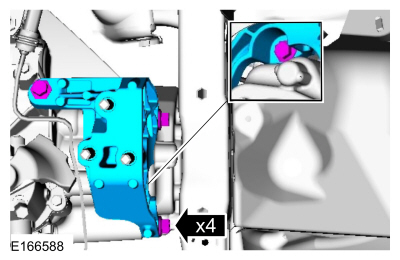
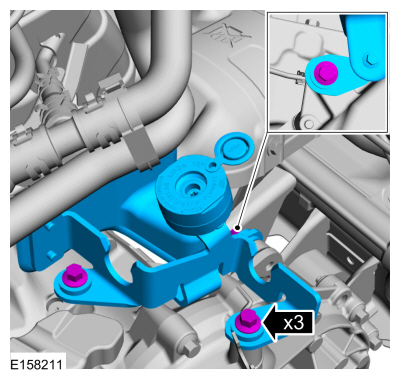
Install the transmission support insulator bracket and the bolts.
Torque:
59 lb.ft (80 Nm)
-
-
Install the transmission support insulator bracket bolts.
Torque:
66 lb.ft (90 Nm)
-
Install the transmission support insulator bracket nuts.
Torque:
92 lb.ft (125 Nm)
-
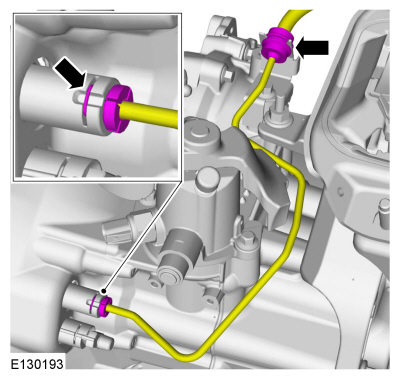
Connect the slave cylinder hydraulic tube to the slave cylinder.
-
Install the cowl panel.
Refer to: Cowl Panel (501-02 Front End Body Panels, Removal and Installation).
-
NOTE:
Note the different lengths of the bolts.
Install the lower bellhousing bolts.
Torque:
35 lb.ft (48 Nm)
-
NOTE:
If the transmission has been replaced or overhauled, the seals do not need to be replaced.
Remove and discard the LH halfshaft seal.
-
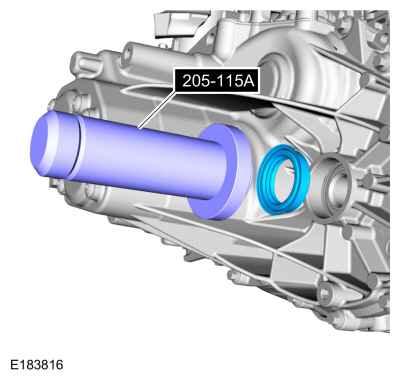
Using the special tool, install a new LH halfshaft seal.
Use Special Service Tool: 205-115A
(205-115)
Installer, Drive Pinion Seal.
-
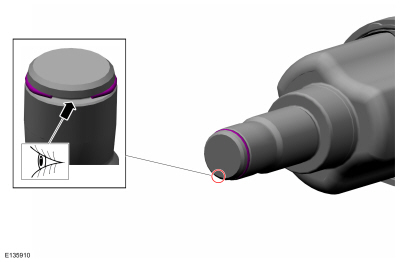
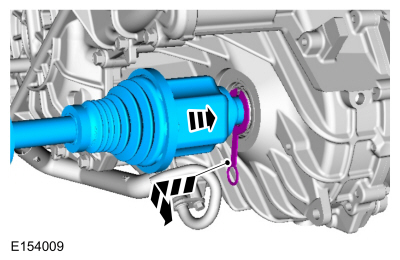
Install the halfshaft retaining circlip.
-
NOTE:
Do not fully install shaft at this time.
-
Using part: AA5P-4N206-A.
Pull the LH halfshaft outward to make sure the circlip is locked.
-
Remove the special tool before completely installing the halfshaft.
-
NOTE:
Insert halfshaft until circlip is fully seated. When
checking if circlip is seated do not pull on CV joints or damage can
result.
Remove the seal protector and fully insert the LH halfshaft until the circlip is seated.
-
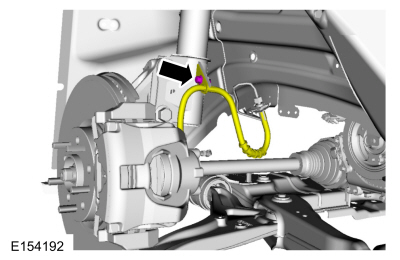
Install the LH brake hose on the strut.
Torque:
19 lb.ft (26 Nm)
-
NOTE:
If the transmission has been replaced or overhauled, the seals do not need to be replaced.
Remove and discard the RH halfshaft seal.
-
Using the special tool install the new RH halfshaft seal.
Use Special Service Tool: 205-115A
(205-115)
Installer, Drive Pinion Seal.
-
NOTE:
Do not fully install shaft at this time.
-
Using part: AA5P-4N206-A.
-
Remove the special tool before completely installing the halfshaft.
-
NOTE:
Insert the intermediate shaft into the transmission
until the intermediate shaft bearing is centered in the concave groove
of the intermediate shaft bearing bracket.
Install the RH halfshaft.
-
Tighten:
Install the new half shaft bearing strap and nuts.
Torque:
Stage 1:
Lower nut::
44 lb.in (5 Nm)
Stage 2:
Upper nut::
18 lb.ft (25 Nm)
Stage 3:
Lower nut::
18 lb.ft (25 Nm)
-
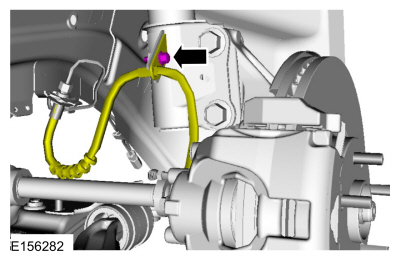
Install the RH brake hose on the strut.
Torque:
19 lb.ft (26 Nm)
-
Install the subframe.
Refer to: Front Subframe (502-00 Uni-Body, Subframe and Mounting System, Removal and Installation).
-
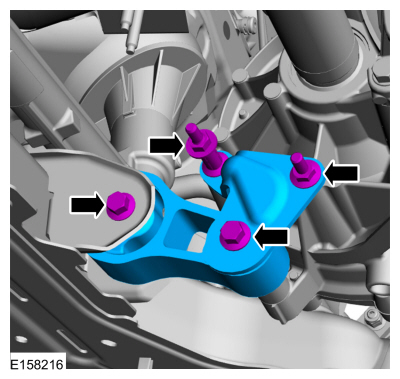
Install the bolts and the roll restrictor.
Torque:
52 lb.ft (70 Nm)
-
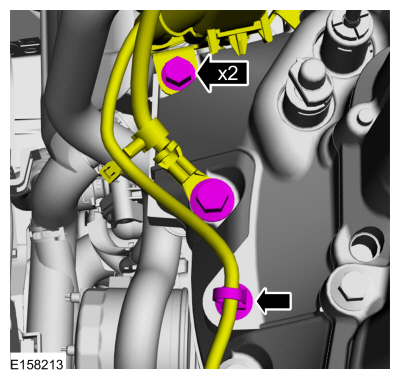
Install the catalytic converter support bracket.
Torque:
18 lb.ft (24 Nm)
-
Install the muffler and tailpipe flange nuts and gasket.
Torque:
35 lb.ft (48 Nm)
-
Install the rear exhaust hanger isolator.
-
Remove the flexpipe support.
-
Install the CAC inlet tube assembly.
-
Install the clamps.
Torque:
44 lb.in (5 Nm)
-
Install the nuts.
Torque:
97 lb.in (11 Nm)
-
Install the CAC outlet tube assembly and connect the electrical connector.
-
Install the nut.
Torque:
97 lb.in (11 Nm)
-
Tighten the clamp.
Torque:
44 lb.in (5 Nm)
-
Check the transmision fluid level.
Refer to: Transmission Fluid Level Check (308-03B Manual Transmission - 6-Speed Manual Transmission – B6, General Procedures).
-
Install the starter motor.
-
If equipped.
Install ground cable mounting, bolts and retainers.
Torque:
35 lb.ft (48 Nm)
-
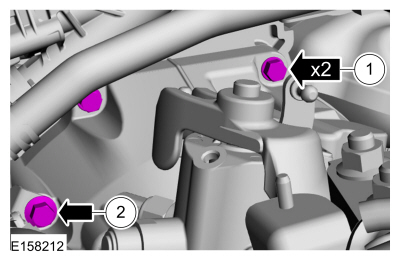
Install the bellhousing bolts.
Torque:
35 lb.ft (48 Nm)
-
Install the shift cable bracket and the bolts.
Torque:
18 lb.ft (25 Nm)
-
Install the transmission shift cables.
-
Connect the electrical connector.
-
Slide the locking tab and install selector lever cables on the transmission.
-
Adjust the gearshift cable.
Refer to: Gearshift Cable Adjustment - 6-Speed Manual Transmission – B6
(308-06 Manual Transmission External Controls - 5-Speed Manual
Transmission – B5/IB5/6-Speed Manual Transmission – B6, General
Procedures).
-
Install the battery tray bracket and nuts.
Torque:
89 lb.in (10 Nm)
-
Install the wiring harness.
Torque:
89 lb.in (10 Nm)
-
Install the battery tray.
Refer to: Battery Tray - 1.6L EcoBoost (132kW/180PS) – Sigma (414-01 Battery, Mounting and Cables, Removal and Installation).
-
Bleed the clutch system.
Refer to: Clutch System Bleeding (308-02 Clutch Controls - 5-Speed
Manual Transmission – B5/IB5/6-Speed Manual Transmission – B6, General
Procedures).
-
If equipped.
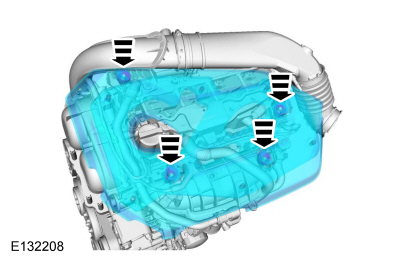
Install the engine appearance cover.
Other information:
Removal
NOTE:
Removal steps in this procedure may contain installation details.
Remove the floor console.
Refer to: Floor Console (501-12 Instrument Panel and Console, Removal and Installation).
Remove the parking brake cable adjustment lock nut.
Loosen the parking brake cable adjustment nut.
Loosen:
..
Removal
NOTE:
Removal steps in this procedure may contain installation details.
NOTE:
The HCU and ABS module are serviced as an assembly.
NOTE:
The PMI process must begin with the current ABS module installed. If
the current ABS module does not respond to the diagnostic scan tool, the
tool may prompt for As-Built Data as part of the repair.
If installing a ne..
Categories
Removal
NOTE:
Removal steps in this procedure may contain installation details.
 WARNING:
Before beginning any service procedure in this
manual, refer to health and safety warnings in section 100-00 General
Information. Failure to follow this instruction may result in serious
personal injury.
Refer to: Health and Safety Precautions (100-00 General Information, Description and Operation).
Remove the wheel and tire.
Refer to: Wheel and Tire (204-04A Wheels and Tires, Removal and Installation).
read more












 WARNING:
Before beginning any service procedure in this
manual, refer to health and safety warnings in section 100-00 General
Information. Failure to follow this instruction may result in serious
personal injury.


