Ford Fiesta: Engine - 1.6L EcoBoost (132kW/180PS) – Sigma / Oil Pan. Removal and Installation
Special Tool(s) /
General Equipment
| Strap Wrench |
| Oil Drain Equipment |
Materials
| Name |
Specification |
Motorcraft® High Performance Engine RTV Silicone
TA-357 |
WSE-M4G323-A6
|
Engine Oil - SAE 5W-20 - Synthetic Blend Motor Oil
XO-5W20-Q1SP |
WSS-M2C945-B1
|
Removal
-
With the vehicle in NEUTRAL, position it on a hoist.
Refer to: Jacking and Lifting - Overview (100-02 Jacking and Lifting, Description and Operation).
-
Remove the oil level indicator.
-
-
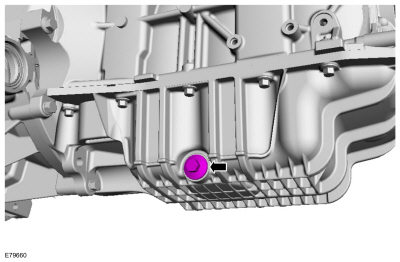
Remove the oil pan drain plug and drain the engine oil.
Use the General Equipment: Oil Drain Equipment
-
Install the oil pan drain plug.
Torque:
21 lb.ft (28 Nm)
-
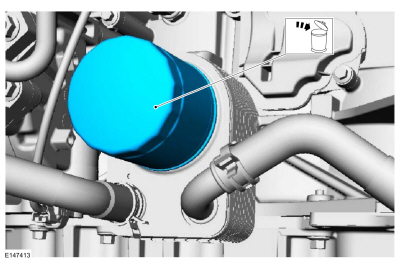
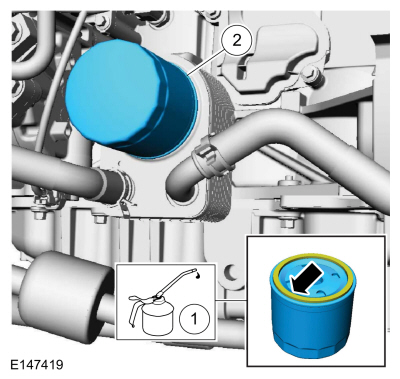
Remove and discard the engine oil filter.
Use the General Equipment: Strap Wrench
-
-
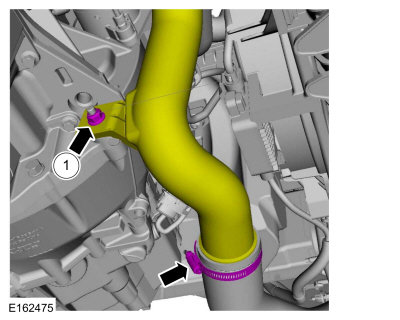
Remove the nut.
-
Loosen the clamp, position aside the CAC tube.
-
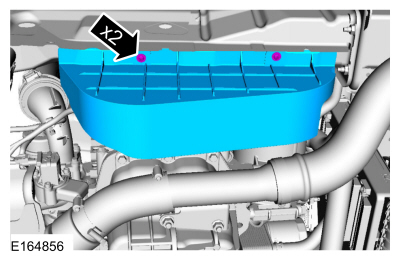
Remove the retainers and the shield.
-
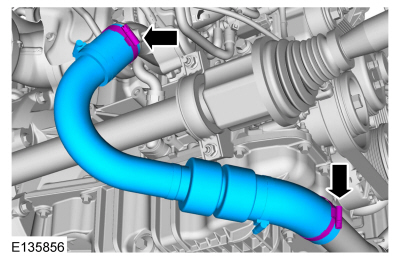
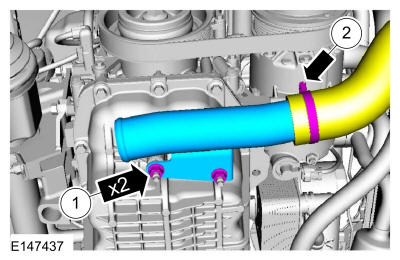
Loosen the clamps and remove the CAC tube.
-
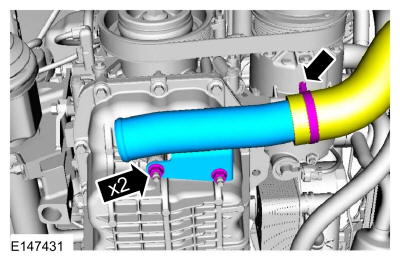
Loosen the clamp, remove the nuts and the CAC tube.
-
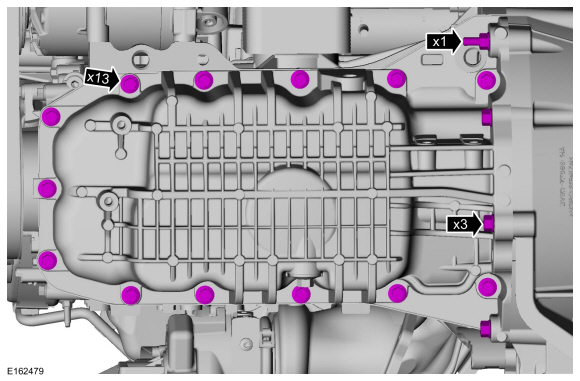
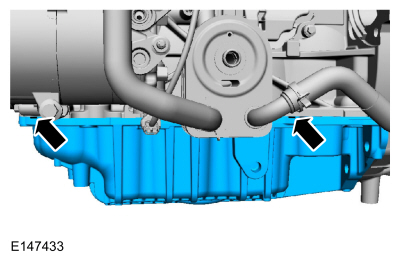
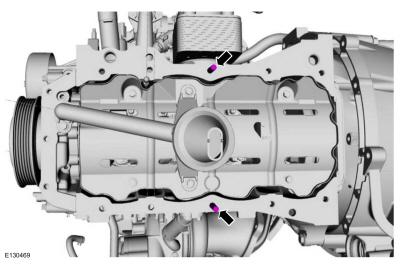
Remove the oil pan bolts.
-
Using the pry pads, remove the oil pan.
Installation
-
Clean and prepare the RTV sealing surface.
Refer to: RTV Sealing Surface Cleaning and Preparation (303-00 Engine System - General Information, General Procedures).
-
Clean and prepare the RTV sealing surface.
Refer to: RTV Sealing Surface Cleaning and Preparation (303-00 Engine System - General Information, General Procedures).
-
Clean and prepare the RTV sealing surface.
Refer to: RTV Sealing Surface Cleaning and Preparation (303-00 Engine System - General Information, General Procedures).
-
Install the following items:
-
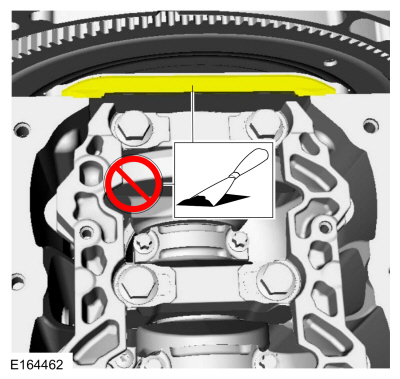
NOTE:
The component must be installed within 5 minutes of applying the sealant.
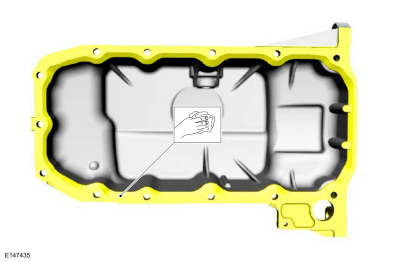
Apply a 3.5 mm (0.137 in) bead of silicone sealant.
Material: Motorcraft® High Performance Engine RTV Silicone
/ TA-357
(WSE-M4G323-A6)
-
Remove the following items:
-
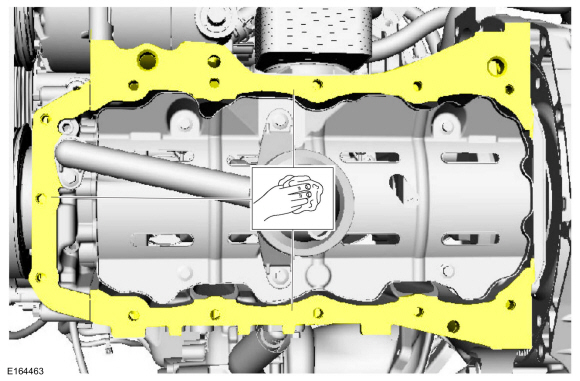
Install the oil pan and remove the two M8x20 studs.
-
NOTE:
Only tighten the bolts finger tight at this stage.
Install the bolts finger tight.
-
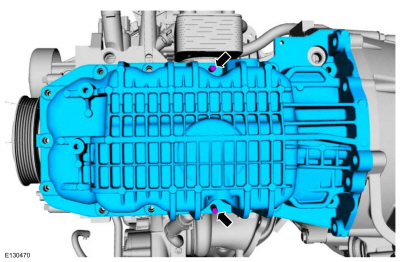
Tighten the oil pan bolts in sequence shown.
Torque:
1 - 4:
35 lb.ft (47 Nm)
5 - 17:
89 lb.in (10 Nm)
5 - 17:
168 lb.in (19 Nm)
-
-
Install the CAC tube and the nuts.
Torque:
159 lb.in (18 Nm)
-
Tighten the clamp.
Torque:
44 lb.in (5 Nm)
-
Install the CAC tube and tighten the clamps.
Torque:
44 lb.in (5 Nm)
-
Install the shield and the retainers.
-
-
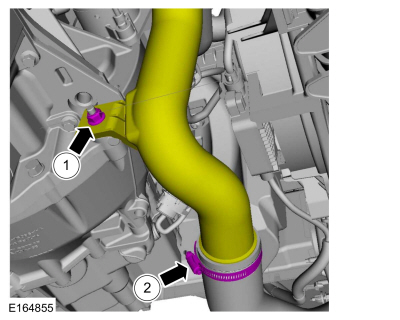
Position the CAC tube and tighten the nut.
Torque:
133 lb.in (15 Nm)
-
Tighten the clamp.
Torque:
44 lb.in (5 Nm)
-
Lubricate and install the new engine oil filter.
Material: Engine Oil - SAE 5W-20 - Synthetic Blend Motor Oil
/ XO-5W20-Q1SP
(WSS-M2C945-B1)
Torque:
128 lb.in (14.5 Nm)
-
Fill the engine with engine oil.
Material: Engine Oil - SAE 5W-20 - Synthetic Blend Motor Oil
/ XO-5W20-Q1SP
(WSS-M2C945-B1)
-
Install the oil level indicator.
Special Tool(s) /
General Equipment
Strap Wrench
Oil Drain Equipment
Locking Pliers
Materials
Name
Specification
Engine Oil - SAE 5W-20 - Synthetic Blend Motor OilXO-5W20-Q1SP
WSS-M2C945-B1
Removal
NOTE:
Removal steps in this procedure may contain installation details...
Special Tool(s) /
General Equipment
Strap Wrench
Oil Drain Equipment
Hose Clamp Remover/Installer
Materials
Name
Specification
Engine Oil - SAE 5W-20 - Synthetic Blend Motor OilXO-5W20-Q1SP
WSS-M2C945-B1
Motorcraft® Thread Sealant with PTFETA-24-B
WSK-M2G350-A2
Removal
With the vehicle in NEUTRAL..
Other information:
Materials
Name
Specification
Motorcraft® Dual Clutch Transmission FluidXT-11-QDC
WSS-M2C200-D2
Removal
Remove the battery tray.
Refer to: Battery Tray - 1.6L EcoBoost (132kW/180PS) – Sigma (414-01 Battery, Mounting and Cables, Removal and Installation).
Remove the air cleaner.
Refer to: Air Cleaner (303-12B Intake Air Distr..
Check
NOTE:
No factory-equipped vehicle should have more than a 25 mA
(0.025 amp) – 50 mA (0.050) draw depending on the vehicle's accessories.
Check for current drains on the battery in excess of 25 mA (0.025 amp) –
50 mA (0.050) with all the electrical accessories off and the vehicle
at rest for at least 40 minutes. Current drains can be tested with the
following procedure.
..
Categories
Special Tool(s) /
General Equipment
Master Cylinder Bleeding Set
Bleeding
NOTICE:
If the fluid is spilled on the paintwork, the affected area must be immediately washed down with cold water.
Master Cylinder
NOTE:
When a new brake master cylinder has been installed, it
should be primed to prevent air from entering the system.
NOTE:
Make sure the area around the master cylinder cap is clean and free of foreign material.
Remove the brake fluid reservoir cap.
read more


 Oil Cooler. Removal and Installation
 Oil Pressure Switch. Removal and Installation