Ford Fiesta: Glass, Frames and Mechanisms / Rear Window Glass Reseal - 4-Door. General Procedures
Materials
| Name | Specification |
|---|---|
| Sika® SikaTack® MACH 60 / Sika® SikaTack® MACH 30 / Dow® BETASEAL™ Express | - |
| Sika Tack ASAP Urethane Adhesive | - |
| Motorcraft® Ultra-Clear Spray Glass Cleaner ZC-23 |
ESR-M14P5-A |
Repair
-
Remove the headliner.
Refer to: Headliner - 4-Door (501-05 Interior Trim and Ornamentation, Removal and Installation).
-
Remove the parcel shelf.
Refer to: Parcel Shelf (501-05 Interior Trim and Ornamentation, Removal and Installation).
-
Check the rear window glass seal for air or water leaks through the urethane adhesive bead.
 |
-
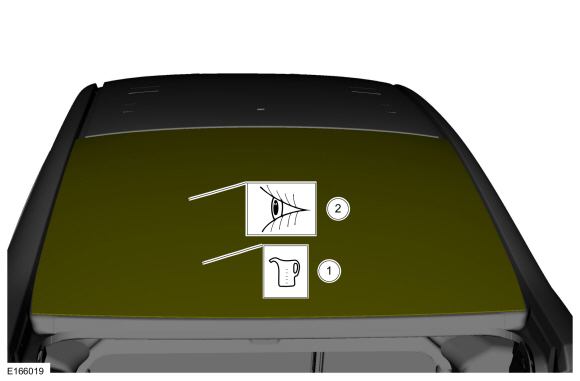
Clean the interior and exterior of the rear window glass surface with glass cleaner.
Material: Motorcraft® Ultra-Clear Spray Glass Cleaner / ZC-23 (ESR-M14P5-A)
 |
-
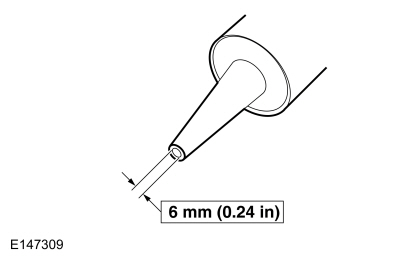
Cut the urethane adhesive applicator tip to specification.
-
NOTE: Use an air caulking gun or a high-ratio, electric or battery-operated caulk gun to apply the urethane adhesive with less effort and a continuous bead.
NOTE: Make sure there are no gaps in the urethane adhesive bead.
NOTE: Allow the urethane adhesive to cure for a minimum of one hour before testing for air or water leaks.
Apply the urethane adhesive over the top of the existing urethane adhesive.
Material: Sika Tack ASAP Urethane Adhesive
Material: Sika® SikaTack® MACH 60 / Sika® SikaTack® MACH 30 / Dow® BETASEAL™ Express
-
-
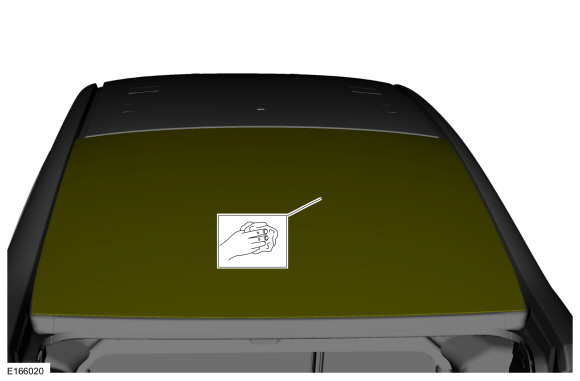
From inside the vehicle, apply the urethane adhesive to the top and sides of the rear window glass.
Material: Sika Tack ASAP Urethane Adhesive
Material: Sika® SikaTack® MACH 60 / Sika® SikaTack® MACH 30 / Dow® BETASEAL™ Express
-
From inside the vehicle, apply the urethane adhesive to the bottom of the rear window glass.
Material: Sika Tack ASAP Urethane Adhesive
Material: Sika® SikaTack® MACH 60 / Sika® SikaTack® MACH 30 / Dow® BETASEAL™ Express
-
From inside the vehicle, apply the urethane adhesive to the top and sides of the rear window glass.
 |
-
After the urethane adhesive has cured, check the rear window glass seal for air or water leaks through the urethane adhesive bead and add urethane adhesive as necessary. WARNING:
Do not drive vehicle until the urethane adhesive
seal has cured. Follow urethane adhesive manufacturer's curing
directions. Inadequate or incorrect curing of the urethane adhesive seal
will adversely affect glass retention. Failure to follow these
instructions may result in serious injury to vehicle occupant(s).
WARNING:
Do not drive vehicle until the urethane adhesive
seal has cured. Follow urethane adhesive manufacturer's curing
directions. Inadequate or incorrect curing of the urethane adhesive seal
will adversely affect glass retention. Failure to follow these
instructions may result in serious injury to vehicle occupant(s).
|
-
Install the parcel shelf.
Refer to: Parcel Shelf (501-05 Interior Trim and Ornamentation, Removal and Installation).
-
Install the headliner.
Refer to: Headliner - 4-Door (501-05 Interior Trim and Ornamentation, Removal and Installation).
-
If necessary, remove excess urethane adhesive from the interior or exterior surface of the rear window glass.
Material: Motorcraft® Ultra-Clear Spray Glass Cleaner / ZC-23 (ESR-M14P5-A)
|

 Rear Window Glass Reseal - 5-Door. General Procedures
Materials
Name
Specification
Sika® SikaTack® MACH 60 / Sika® SikaTack® MACH 30 / Dow® BETASEAL™ Express
-
Sika Tack ASAP Urethane Adhesive
-
Motorcraft® Ultra-Clear Spray Glass CleanerZC-23
ESR-M14P5-A
Repair
Remove the liftgate trim panel...
Other information:
Ford Fiesta 2014 - 2019 Service Manual: Camshafts. Removal and Installation
Special Tool(s) / General Equipment 303-1532Installer, Camshaft SealTKIT-2010B-FLMTKIT-2010B-ROW 303-393-02Adapter for 303-393TKIT-2012A-FLTKIT-2012A-ROW 303-393ALocking Tool, FlywheelTKIT-2012A-FLTKIT-2012A-ROW 303-409 (T92C-6700-CH) Remover, Crankshaft SealTKIT-1992-FH/FMH/FLMHTKIT-1993-LMH/MH 303-748Locking Tool, CrankshaftTKIT-2010B-F..
Ford Fiesta 2014 - 2019 Service Manual: Luggage Compartment Lid. Removal and Installation
Removal NOTE: Removal steps in this procedure may contain installation details. Remove the pin-type retainers and the luggage compartment lid trim panel. Disconnect the electrical connectors, detach the wiring harness retainers and position the wiring harness aside. NOTE: This..
Categories
- Manuals Home
- Ford Fiesta Service Manual (2014 - 2019)
- Engine System - General Information
- Camshafts. Removal and Installation
- Engine
- Timing Belt. Removal and Installation
- Engine Component View. Description and Operation
Front Strut and Spring Assembly. Removal and Installation
Removal
NOTE: Removal steps in this procedure may contain installation details.
NOTE: This step is only necessary when installing a new component to the left-hand side.
Remove the nuts and position aside the remote brake fluid reservoir.Torque: 62 lb.in (7 Nm)
 Remove the strut and spring assembly upper mount nuts.
 Torque: 22 lb.ft (30 Nm)
