Ford Fiesta: Glass, Frames and Mechanisms / Front Door Window Regulator. Removal and Installation
Removal
NOTE: Removal steps may contain installation details.
NOTE: Driver side shown, passenger side similar.
All vehicles
-
Remove the front door trim panel.
Refer to: Front Door Trim Panel (501-05 Interior Trim and Ornamentation, Removal and Installation).
-
Remove the adhesive tape covers.
 |
Vehicles with manual windows
-
Lower the front door window glass.
-
Partially install the window crank handle.
-
Lower the front door window glass.
-
Partially install the window crank handle.
 |
Vehicles with power windows
-
Lower the front door window glass.
-
Partially install the front door window control switch.
-
Lower the front door window glass.
-
Partially install the front door window control switch.
 |
All vehicles
-
Remove the bolts from the front door window glass.
 |
Vehicles with manual windows
-
Raise the front door window glass and tape the front door window glass in place.
-
Remove the front door window crank handle.
-
Raise the front door window glass.
-
Tape the front door window glass in place.
-
Remove the front door window crank handle.
 |
Vehicles with power windows
-
Raise the front door window glass and tape the front door window glass in place.
-
Remove the front door window control switch.
-
Raise the front door window glass.
-
Tape the front door window glass in place.
-
Remove the front door window control switch.
 |
All vehicles
-
Remove the exterior front door handle.
Refer to: Exterior Front Door Handle (501-14 Handles, Locks, Latches and Entry Systems, Removal and Installation).
-
Remove the front door latch bolts.
Torque: 71 lb.in (8 Nm)
 |
-
Remove the exterior front door handle reinforcement screw.
 |
-
NOTE: Do not remove the front door carrier from the door.
NOTE: During installation, make sure the front door carrier tabs are correctly positioned inside the run channel retainers before sliding the front door carrier in place. Otherwise, the front door carrier will prevent the installation of the window glass.
Position aside the front door carrier and latch assembly.
-
Disconnect the front door exterior mirror electrical connector.
-
Remove the bolts from the front door carrier.
Torque: 80 lb.in (9 Nm)
-
NOTE: During removal make sure the exterior front door handle reinforcement is released from the door before positioning aside the front door carrier and latch assembly. Otherwise, the exterior front door handle reinforcement could be damaged.
Position aside the front door carrier and latch assembly.
-
Disconnect the front door exterior mirror electrical connector.
 |
-
NOTE: Back side of front door carrier shown for clarity.
NOTE: Do not remove the carrier from the door.
NOTE: During installation, make sure the front door carrier tabs are correctly positioned inside the run channel retainers before sliding the front door carrier in place. Otherwise, the front door carrier will prevent the installation of the window glass.
Remove the front door latch assembly.
-
Slide the latch assembly off the retaining tabs securing it to the front door carrier.
-
Disconnect the front door latch electrical connector from the front door latch.
-
Remove the interior door handle cable and grommet from the front door carrier.
-
Release the routing clips for the exterior door
handle electrical harness and remove the front door latch assembly.
-
Slide the latch assembly off the retaining tabs securing it to the front door carrier.
 |
-
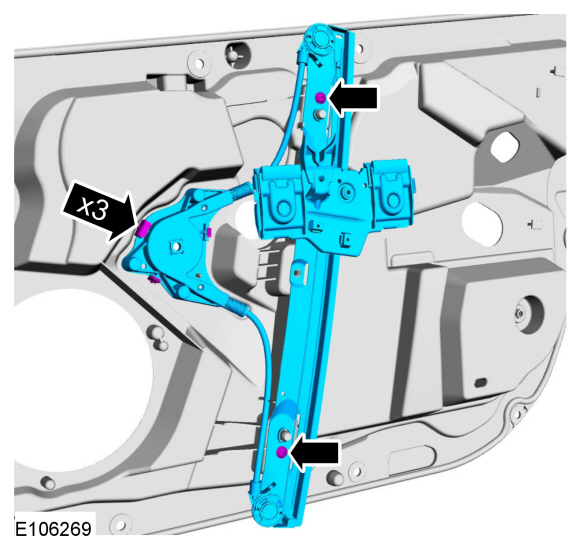
NOTE: Do not remove the front door carrier from the door.
NOTE: Front door carrier shown removed from door for clarity.
Remove the retainers from the front door window regulator.
Torque: 31 lb.in (3.5 Nm)
 |
-
NOTE: Do not remove the front door carrier from the door.
NOTE: Front door carrier shown removed from door for clarity.
Remove the retainers and remove the front door window regulator.
Torque: 31 lb.in (3.5 Nm)
 |
Installation
-
To install, reverse the removal procedure.
-
If the door is equipped with one-touch up, the power window motor must be initialized.
Refer to: Power Door Window Initialization (501-11 Glass, Frames and Mechanisms, General Procedures).
 Rear Door Glass Top Run. Removal and Installation
Removal
NOTE:
RH shown, LH similar.
Remove the rear door window glass.
Refer to: Rear Door Window Glass (501-11 Glass, Frames and Mechanisms, Removal and Installation)...
 Rear Door Window Regulator. Removal and Installation
Removal
NOTE:
RH shown, LH similar.
NOTE:
Removal steps in this procedure may contain installation details.
All vehicles
Remove the rear door trim panel...
Other information:
Ford Fiesta 2014 - 2019 Service Manual: Brake Caliper. Removal and Installation
Removal NOTE: Removal steps in this procedure may contain installation details. Remove the wheel and tire. Refer to: Wheel and Tire (204-04A Wheels and Tires, Removal and Installation). NOTICE: If the fluid is spilled on the paintwork, the affected area must be immediately washed down with cold water...
Ford Fiesta 2014 - 2019 Service Manual: Axle - 1.6L EcoBoost (132kW/180PS) – Sigma. Removal and Installation
Special Tool(s) / General Equipment Transmission Jack Vehicle/Axle Stands Removal NOTICE: Suspension fasteners are critical parts that affect performance of vital components and systems. Failure of these fasteners may result in major service expense...
Categories
- Manuals Home
- Ford Fiesta Service Manual (2014 - 2019)
- Front Suspension
- Timing Belt. Removal and Installation
- Engine Cooling - 1.6L EcoBoost (132kW/180PS) – Sigma
- Engine. Assembly
- Engine Component View. Description and Operation
Component Bleeding. General Procedures
Special Tool(s) / General Equipment
Master Cylinder Bleeding SetBleeding
NOTICE: If the fluid is spilled on the paintwork, the affected area must be immediately washed down with cold water.
Master Cylinder
NOTE: When a new brake master cylinder has been installed, it should be primed to prevent air from entering the system.
NOTE: Make sure the area around the master cylinder cap is clean and free of foreign material.
Remove the brake fluid reservoir cap.