Ford Fiesta: Battery, Mounting and Cables / Battery Tray - 1.6L EcoBoost (132kW/180PS) – Sigma. Removal and Installation
Ford Fiesta 2014 - 2019 Service Manual / Battery and Charging System / Battery, Mounting and Cables / Battery Tray - 1.6L EcoBoost (132kW/180PS) – Sigma. Removal and Installation
Removal
-
Follow the health and safety precautions. WARNING:
Before beginning any service procedure in this
section, refer to Safety Warnings in section 100-00 General Information.
Failure to follow this instruction may result in serious personal
injury.
WARNING:
Before beginning any service procedure in this
section, refer to Safety Warnings in section 100-00 General Information.
Failure to follow this instruction may result in serious personal
injury.
Refer to: Health and Safety Precautions (100-00 General Information, Description and Operation).
-
Remove the battery.
Refer to: Battery (414-01 Battery, Mounting and Cables, Removal and Installation).
-
Remove the air cleaner outlet pipe.
Refer to: Air Cleaner Outlet Pipe (303-12A Intake Air Distribution and Filtering - 1.6L Duratec-16V Ti-VCT (88kW/120PS) – Sigma, Removal and Installation).
Refer to: Air Cleaner Outlet Pipe (303-12B Intake Air Distribution and Filtering - 1.6L EcoBoost (132kW/180PS) – Sigma, Removal and Installation).
-
Remove the air cleaner.
Refer to: Air Cleaner (303-12A Intake Air Distribution and Filtering - 1.6L Duratec-16V Ti-VCT (88kW/120PS) – Sigma, Removal and Installation).
Refer to: Air Cleaner (303-12B Intake Air Distribution and Filtering - 1.6L EcoBoost (132kW/180PS) – Sigma, Removal and Installation).
1.0L EcoBoost (90kW/120PS)
-
Remove the bolt and the PCM cover.
Torque: 53 lb.in (6 Nm)
 |
1.6L EcoBoost (132kW/180PS) - Sigma
-
-
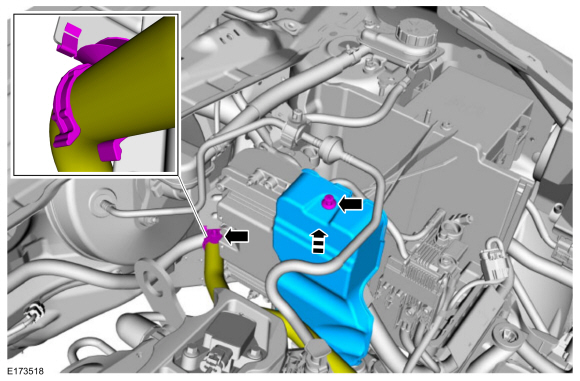
Release the clip and position aside the tube.
-
Remove the bolt and the PCM cover.
-
Release the clip and position aside the tube.
 |
All vehicles
-
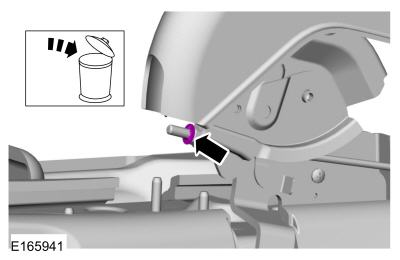
Disconnect the PCM electrical connectors.
 |
-
Remove the bolts and the battery tray.
Torque: 89 lb.in (10 Nm)
 |
1.0L EcoBoost (90kW/120PS)
-
NOTE: This step is only necessary when installing a new component.
Remove the bolt and the PCM .
Torque: 44 lb.in (5 Nm)
 |
1.6L EcoBoost (132kW/180PS) - Sigma
-
NOTE: This step is only necessary when installing a new component.
Remove the bolt and the PCM .
Torque: 44 lb.in (5 Nm)
 |
Installation
-
To install, reverse the removal procedure.
 Battery Monitoring Sensor. Removal and Installation
Removal
WARNING:
Before beginning any service procedure in this
section, refer to Safety Warnings in section 100-00 General Information...
 Battery Cables. Removal and Installation
Removal
Negative battery cable
If equipped, remove the battery monitoring sensor.
Refer to: Battery Monitoring Sensor (414-01 Battery, Mounting and Cables, Removal and Installation)...
Other information:
Ford Fiesta 2014 - 2019 Service Manual: Glass, Frames and Mechanisms - Vehicles With: One-Touch Open and Close Driver Window - Overview. Description and Operation
Overview Standard power window features include one-touch up/down operation (driver front window only) when the master window control switch is momentarily pressed to the second detent and released. The master window control switch: disables operation of the rear passenger windows when the lock-out switch is in the UNLOCK position...
Ford Fiesta 2014 - 2019 Service Manual: Quick Release Coupling. General Procedures
Disconnect NOTICE: When reusing liquid or vapor tube connections, make sure to use compressed air to remove any foreign material from the connector retaining clip area before separating from the tube or damage to the tube or connector retaining clip may occur...
Categories
- Manuals Home
- Ford Fiesta Service Manual (2014 - 2019)
- Engine
- Engine Component View. Description and Operation
- Body Control Module (BCM). Removal and Installation
- Climate Control System - General Information
- Front Suspension
Parking Brake Control. Removal and Installation
Removal
NOTE: Removal steps in this procedure may contain installation details.
Remove the floor console.Refer to: Floor Console (501-12 Instrument Panel and Console, Removal and Installation).
Remove the driver seat.
Refer to: Front Seat (501-10 Seating, Removal and Installation).
Remove the parking brake cable adjustment lock nut.
 Loosen the parking brake cable adjustment nut.
Copyright © 2024 www.fofiesta7.com