Ford Fiesta: Side Panel Sheet Metal Repairs / B-Pillar Outer Panel. Removal and Installation
Ford Fiesta 2014 - 2019 Service Manual / Body and Paint / Side Panel Sheet Metal Repairs / B-Pillar Outer Panel. Removal and Installation
Special Tool(s) / General Equipment
| Resistance Spotwelding Equipment | |
| Hot Air Gun | |
| Air Body Saw | |
| MIG/MAG Welding Equipment | |
| Spot Weld Drill Bit | |
| Locking Pliers |
Materials
| Name | Specification |
|---|---|
| Metal Bonding Adhesive TA-1, TA-1-B, 3M™ 08115, LORD Fusor® 108B, Henkel Teroson EP 5055 |
- |
| Seam Sealer TA-2-B, 3M™ 08308, LORD Fusor® 803DTM |
- |
Removal
-
Refer to: Body Repair Health and Safety and General Precautions (100-00 General Information, Description and Operation). WARNING:
Before beginning any service procedure in this
manual, refer to health and safety warnings in section 100-00 General
Information. Failure to follow this instruction may result in serious
personal injury.
WARNING:
Before beginning any service procedure in this
manual, refer to health and safety warnings in section 100-00 General
Information. Failure to follow this instruction may result in serious
personal injury.
-
Depower the SRS .
Refer to: Supplemental Restraint System (SRS) Depowering and Repowering (501-20B Supplemental Restraint System, General Procedures).
-
Rough straighten to restore the vehicle to pre-accident dimensions.
Refer to: Body and Frame (501-26 Body Repairs - Vehicle Specific Information and Tolerance Checks, Description and Operation).
-
Remove the following items:
Refer to: Rear Door (501-03 Body Closures, Removal and Installation).
Refer to: B-Pillar Trim Panel (501-05 Interior Trim and Ornamentation, Removal and Installation).
Refer to: Front Seat (501-10 Seating, Removal and Installation).
Refer to: Rear Seat Cushion (501-10 Seating, Removal and Installation).
Refer to: Headliner - 4-Door (501-05 Interior Trim and Ornamentation, Removal and Installation).
Refer to: Headliner - 5-Door (501-05 Interior Trim and Ornamentation, Removal and Installation).
Refer to: Side Curtain Airbag (501-20B Supplemental Restraint System, Removal and Installation).
Refer to: Rocker Panel Moulding (501-08 Exterior Trim and Ornamentation, Removal and Installation).
-
Remove the rear door hinges and the front door striker.
-
Remove the roof ditch trim.
 |
-
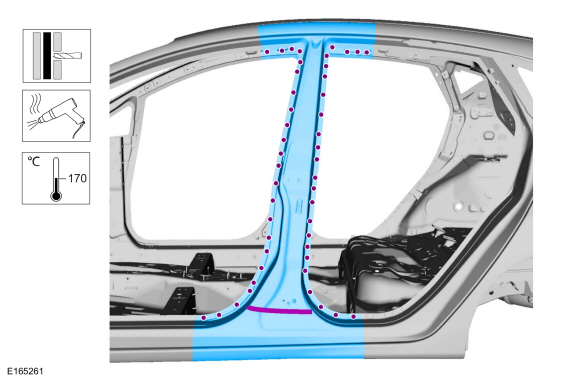
Carefully measure and cut the outer B-pillar as indicated.
Use the General Equipment: Air Body Saw
 |
-
Drill out the spot welds from the lower portion of the B-pillar panel.
Use the General Equipment: Spot Weld Drill Bit
 |
-
Break the adhesive bond, drill out the spot welds and remove the B-pillar panel.
Use the General Equipment: Spot Weld Drill Bit
Use the General Equipment: Hot Air Gun
 |
Installation
-
Carefully measure and cut the replacement panel to fit repair area.
Use the General Equipment: Air Body Saw
 |
-
Apply adhesive as indicated.
Material: Metal Bonding Adhesive / TA-1, TA-1-B, 3M™ 08115, LORD Fusor® 108B, Henkel Teroson EP 5055
 |
-
NOTE: The B-pillar to roof joint is allowed to overlap the roof flange.
-
Install and clamp the new B-pillar outer panel.
Use the General Equipment: Locking Pliers
-
Spot and seam weld the B-pillar outer panel.
Use the General Equipment: MIG/MAG Welding Equipment
Use the General Equipment: Resistance Spotwelding Equipment
-
Install and clamp the new B-pillar outer panel.
 |
-
Spot weld the lower portion of the B-pillar panel.
Use the General Equipment: Resistance Spotwelding Equipment
 |
-
Metal finish the repair area using typical metal finishing techniques.
-
Sealing work: All areas must be sealed to production level.
-
NOTE: Seam seal the B-pillar to roof joint after primer application and before final paint application to prevent water and wind leaks.
Refinish using a Ford approved paint system.
Material: Seam Sealer / TA-2-B, 3M™ 08308, LORD Fusor® 803DTM
-
Restore corrosion protection.
Refer to: Corrosion Prevention (501-25 Body Repairs - General Information, General Procedures).
-
Install the roof ditch trim.
|
-
Install the rear door hinges and the front door striker.
-
Install the following items:
Refer to: Side Curtain Airbag (501-20B Supplemental Restraint System, Removal and Installation).
Refer to: Headliner - 4-Door (501-05 Interior Trim and Ornamentation, Removal and Installation).
Refer to: Headliner - 5-Door (501-05 Interior Trim and Ornamentation, Removal and Installation).
Refer to: Rear Seat Cushion (501-10 Seating, Removal and Installation).
Refer to: B-Pillar Trim Panel (501-05 Interior Trim and Ornamentation, Removal and Installation).
Refer to: Front Seat (501-10 Seating, Removal and Installation).
Refer to: Rear Door (501-03 Body Closures, Removal and Installation).
Refer to: Rocker Panel Moulding (501-08 Exterior Trim and Ornamentation, Removal and Installation).
-
Align the rear door.
Refer to: Rear Door Alignment (501-03 Body Closures, General Procedures).
-
Repower the SRS .
Refer to: Supplemental Restraint System (SRS) Depowering and Repowering (501-20B Supplemental Restraint System, General Procedures).
 B-Pillar and Reinforcement. Removal and Installation
Special Tool(s) /
General Equipment
Resistance Spotwelding Equipment
8 mm Drill Bit
MIG/MAG Welding Equipment
Spot Weld Drill Bit
Locking Pliers
Removal
NOTICE:
The B-pillar inner reinforcement is constructed of boron
steel and cannot be sectioned...
 Front Door Skin Panel. Removal and Installation
Special Tool(s) /
General Equipment
Grinder
Hot Air Gun
Knife
MIG/MAG Welding Equipment
Materials
Name
Specification
Metal Bonding AdhesiveTA-1, TA-1-B, 3M™ 08115, LORD Fusor® 108B, Henkel Teroson EP 5055
-
Seam SealerTA-2-B, 3M™ 08308, LORD Fusor® 803DTM
-
Flexible Foam Repair3M™ 08463, LORD Fuso..
Other information:
Ford Fiesta 2014 - 2019 Service Manual: Headlamps. Diagnosis and Testing
DTC Chart: BCM Diagnostics in this manual assume a certain skill level and knowledge of Ford-specific diagnostic practices. REFER to: Diagnostic Methods (100-00 General Information, Description and Operation). BCM DTC Chart DTC Description Action B1007:92 High-Beam Head..
Ford Fiesta 2014 - 2019 Service Manual: Rear Seatbelt Buckle. Removal and Installation
Removal NOTE: Removal steps in this procedure may contain installation details. Remove the rear seat cushion. Refer to: Rear Seat Cushion (501-10 Seating, Removal and Installation). Remove the bolt and the rear seatbelt buckles. Torque: 35 lb.ft (48 Nm) Installation NOTE: During installation, m..
Categories
- Manuals Home
- Ford Fiesta Service Manual (2014 - 2019)
- Front Suspension
- Clutch - 6-Speed Manual Transmission – B6
- Service Information
- Engine Component View. Description and Operation
- Manual Transmission - 6-Speed Manual Transmission – B6
Brake Backing Plate. Removal and Installation
Removal
NOTE: Removal steps in this procedure may contain installation details.
Remove the brake shoes.Refer to: Brake Shoes (206-02 Drum Brake, Removal and Installation).
Disconnect the brake tube fitting.
Torque: 159 lb.in (18 Nm) Remove the bolt and wheel cylinder.
Torque: 106 lb.in (12 Nm)
 Disconnect the brake shoe lever fitting and re
Copyright © 2025 www.fofiesta7.com