Ford Fiesta: Steering Column / Steering Column. Removal and Installation
Special Tool(s) / General Equipment
| Grinder |
Removal
NOTICE: To prevent damage to the clockspring, make sure the front wheels are in the straight-ahead position.
NOTICE: Precise tolerances are required when manufacturing a steering column. Never install a repaired, rebuilt, aftermarket, or remanufactured steering column. Always install a new steering column. Failure to follow this direction can result in steering column failure.
NOTE: Removal steps in this procedure may contain installation details.
-
Remove the driver knee airbag.
Refer to: Driver Knee Airbag (501-20B Supplemental Restraint System, Removal and Installation).
-
NOTE: This step is only necessary when installing a new component.
Remove the steering wheel.
Refer to: Steering Wheel (211-04 Steering Column, Removal and Installation).
-
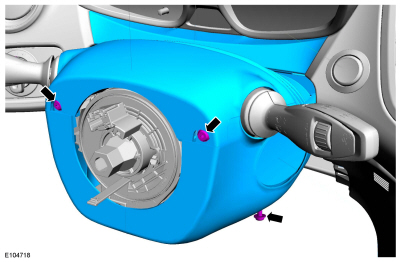
Remove the screws and the steering column shrouds.
Torque: 9 lb.in (1 Nm)
 |
-
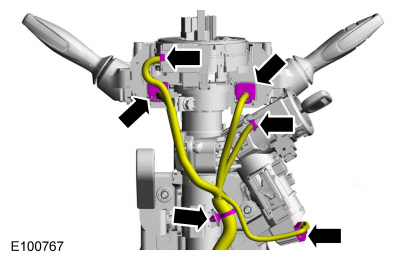
Release the wiring harness retainer and disconnect the steering column electrical connectors.
 |
-
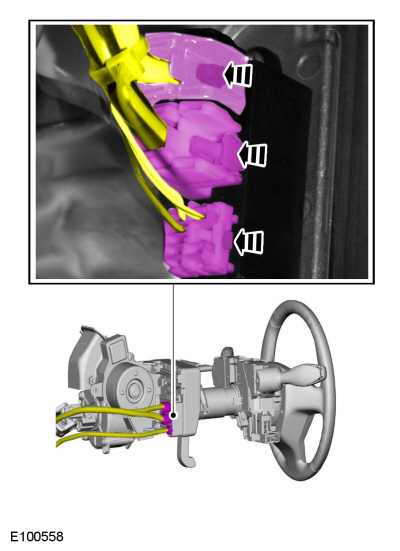
Disconnect the steering column electrical connectors.
 |
-
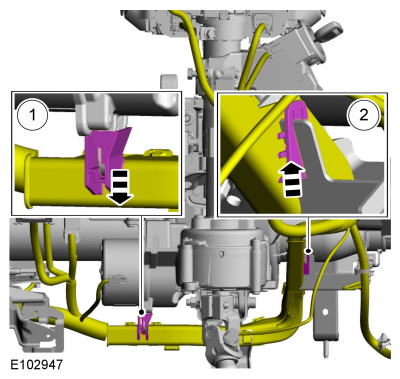
Detatch the retainers and position aside the wiring harness.
 |
-
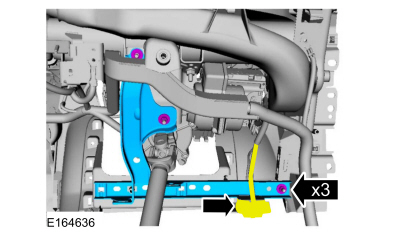
Position aside the wiring harness. Remove the nuts and the cross beam bracket.
Torque: 71 lb.in (8 Nm)
 |
-
NOTICE: Do not allow the steering column to rotate while the steering column shaft is disconnected or damage to the steering column internal sensor may result.
NOTE: This step is only necessary when reinstalling the original component.
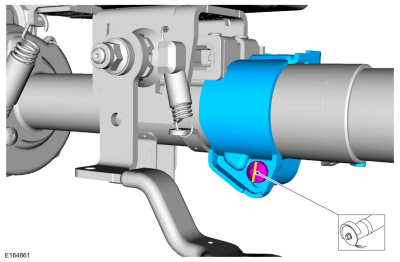
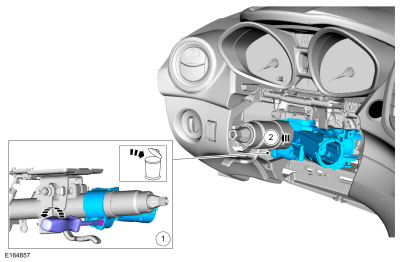
Install M6 x 1 x 30 bolt into the ignition lock cylinder housing and hand tighten to lock the steering column internal shaft.
 |
-
NOTE: This step is only necessary when installing a new component.
-
Remove the bolt.
Torque: 71 lb.in (8 Nm)
-
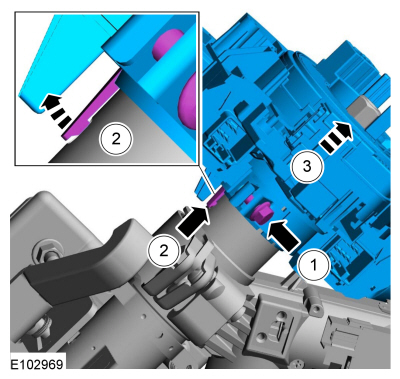
Release the SCCM tab.
-
Remove the SCCM .
-
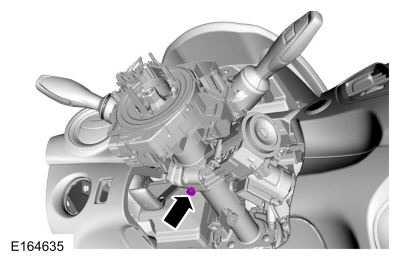
Remove the bolt.
 |
-
NOTE: This step is only necessary when installing a new component.
NOTE: Clean all metal shavings and foreign material after cutting a slot into the ignition lock cylinder housing bolt.
Cut a slot into the ignition lock cylinder housing bolt.
Use the General Equipment: Grinder
 |
-
NOTE: This step is only necessary when installing a new component.
Remove the bolt and the ignition lock cylinder housing.
 |
-
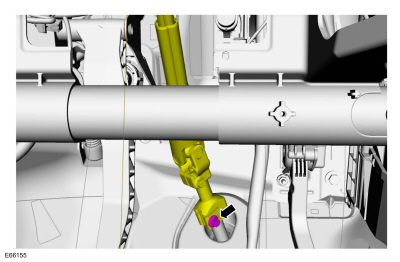
Remove and discard the steering column shaft-to-steering gear bolt. WARNING:
Install a new steering column shaft bolt. Reuse
could result in bolt failure and loss of vehicle control. Failure to
follow this instruction may result in serious injury to vehicle
occupant(s).
WARNING:
Install a new steering column shaft bolt. Reuse
could result in bolt failure and loss of vehicle control. Failure to
follow this instruction may result in serious injury to vehicle
occupant(s).
Torque: 25 lb.ft (34 Nm)
 |
-
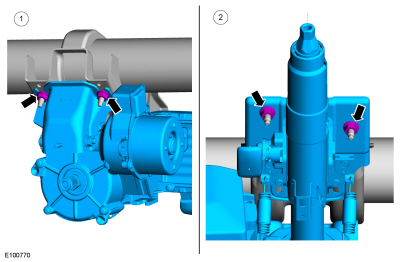
WARNING:
Do not reuse steering column nuts. This may result
in fastener failure and steering column detachment or loss of steering
control. Failure to follow this instruction may result in serious injury
to vehicle occupant(s).
-
Remove and discard the steering column lower nuts.
Torque: 18 lb.ft (24 Nm)
-
Remove and discard the steering column upper nuts.
Torque: 18 lb.ft (24 Nm)
-
Remove and discard the steering column lower nuts.
 |
-
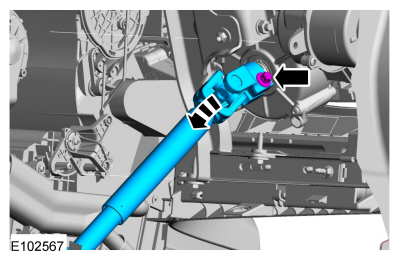
WARNING:
Install a new steering column shaft bolt. Reuse
could result in bolt failure and loss of vehicle control. Failure to
follow this instruction may result in serious injury to vehicle
occupant(s).
NOTE: This step is only necessary when installing a new component.
Remove and discard the steering column shaft-to-steering column bolt.
Torque: 25 lb.ft (34 Nm)
 |
Installation
-
To install, reverse the removal procedure.
-
Using a diagnostic scan tool, perform EPAS configuration.
 Steering Wheel Cover Repair. General Procedures
Materials
Name
Specification
Motorcraft® Instant Gel AdhesiveTA-19-C
WSS-M2G401-B5
Repair
NOTE:
If re-adhering leather to the front side of the
steering wheel only, it will not be necessary to remove the steering
wheel...
 Steering Column Shaft. Removal and Installation
Special Tool(s) /
General Equipment
Steering Wheel Holder
Removal
NOTE:
The removal steps in this procedure may include installation details...
Other information:
Ford Fiesta 2014 - 2019 Service Manual: Body Control Module (BCM). Removal and Installation
Removal NOTE: Removal steps in this procedure may contain installation details. NOTE: This step is only necessary when installing a new component. NOTE: The PMI process must begin with the current BCM installed. If the current BCM does not respond to the diagnostic scan tool, the tool may prompt for As-Built Data as part of the repair...
Ford Fiesta 2014 - 2019 Service Manual: Information and Entertainment System. Diagnosis and Testing
DTC Chart: ACM DTC Description Action B1A01:01 Speaker #1: General Electrical Failure For a LHF door speaker concern, GO to Pinpoint Test H For a LHF door tweeter speaker concern, GO to Pinpoint Test I B1A01:11 Speaker #1: Circuit Short..
Categories
- Manuals Home
- Ford Fiesta Service Manual (2014 - 2019)
- General Information
- Climate Control System - General Information
- Manual Transmission - 6-Speed Manual Transmission – B6
- Timing Belt. Removal and Installation
- Engine System - General Information
Brake Drum. Removal and Installation
Removal
NOTE: Removal steps in this procedure may contain installation details.
 WARNING:
Before beginning any service procedure in this
manual, refer to health and safety warnings in section 100-00 General
Information. Failure to follow this instruction may result in serious
personal injury.
WARNING:
Before beginning any service procedure in this
manual, refer to health and safety warnings in section 100-00 General
Information. Failure to follow this instruction may result in serious
personal injury.
Remove the wheel and tire.
Refer to: Wheel and Tire (204-04A Wheels and Tires, Removal and Installation).