Ford Fiesta: Front End Sheet Metal Repairs / Front Side Member Section. Removal and Installation
Special Tool(s) / General Equipment
| Resistance Spotwelding Equipment | |
| Air Body Saw | |
| 8 mm Drill Bit | |
| MIG/MAG Welding Equipment | |
| Spot Weld Drill Bit |
Removal
-
Refer to: Body Repair Health and Safety and General Precautions (100-00 General Information, Description and Operation). WARNING:
Before beginning any service procedure in this
manual, refer to Safety Warnings in section 100-00 General Information.
Failure to follow this instruction may result in serious personal
injury.
WARNING:
Before beginning any service procedure in this
manual, refer to Safety Warnings in section 100-00 General Information.
Failure to follow this instruction may result in serious personal
injury.
-
Remove the hood.
-
Remove the following items.
Refer to: Fender (501-02 Front End Body Panels, Removal and Installation).
Refer to: Headlamp Assembly (417-01 Exterior Lighting, Removal and Installation).
Refer to: Front Bumper (501-19 Bumpers, Removal and Installation).
-
If required, dimensionally restore vehicle to pre-accident condition.
Refer to: Body and Frame (501-26 Body Repairs - Vehicle Specific Information and Tolerance Checks, Description and Operation).
-
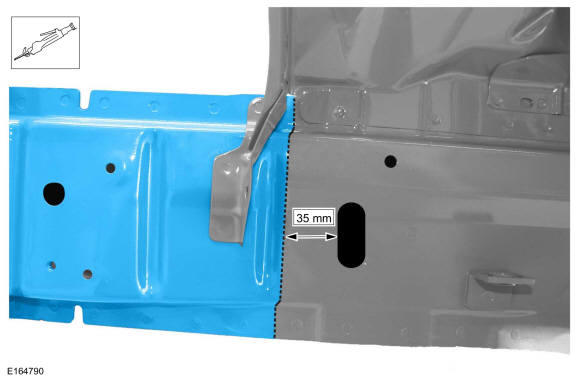
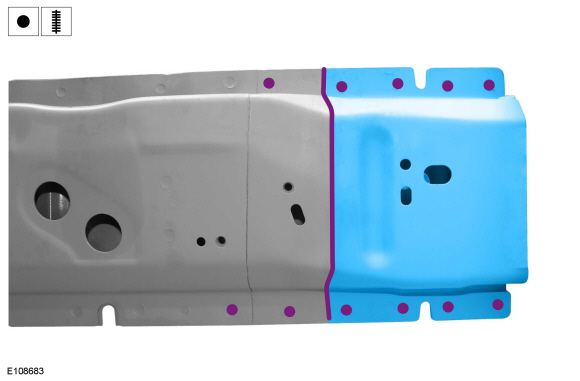
NOTICE: Due to the positions of the inner reinforcement(s), it is very important that the dimension provided is accurately met.
NOTE: The cut shown is the final cut for the inner part.
Carefully measure and cut the side member front inner frame rail.
Use the General Equipment: Air Body Saw
 |
-
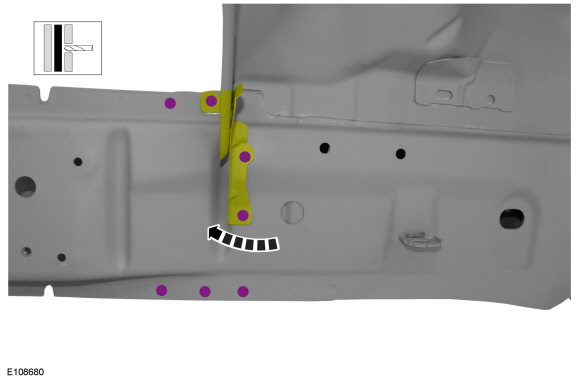
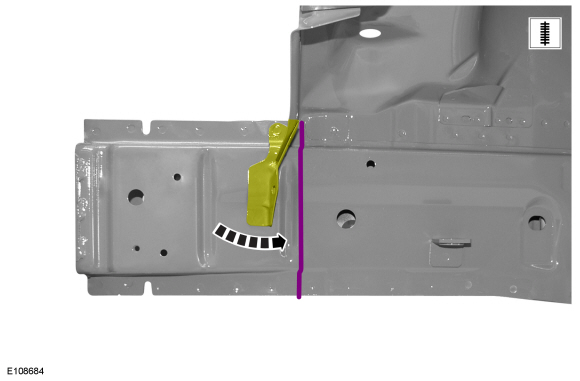
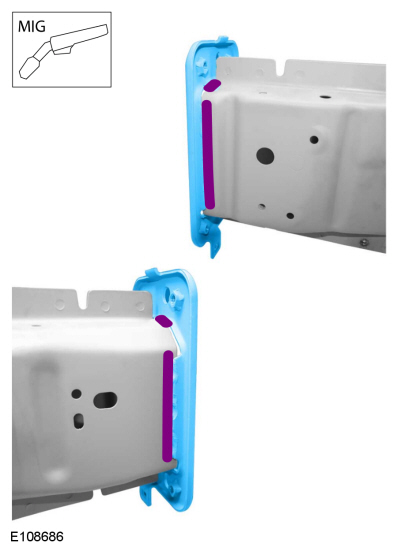
Drill out the spot welds and position aside the bracket.
Use the General Equipment: Spot Weld Drill Bit
 |
-
NOTICE: Do not cut inner part or reinforcements of the side member.
Separating cut through outer part of the front side member.
Carefully measure and cut the side member front outer frame rail.
Use the General Equipment: Air Body Saw
 |
Installation
-
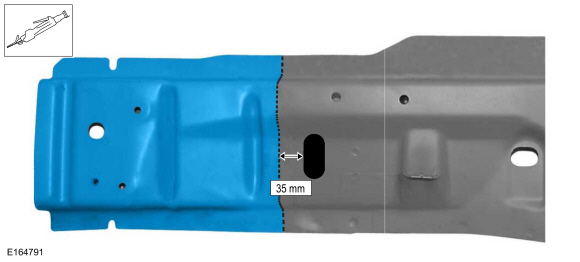
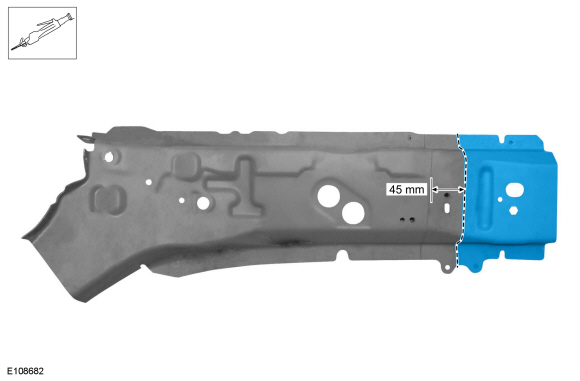
Install the front side member section to the rail frame. Carefully measure and cut to fit repair area.
Use the General Equipment: Air Body Saw
 |
-
Carefully measure and cut the sectioning piece from service part.
Use the General Equipment: Air Body Saw
 |
-
Install the front side member section, spot welds and seam weld.
Use the General Equipment: Resistance Spotwelding Equipment
Use the General Equipment: MIG/MAG Welding Equipment
 |
-
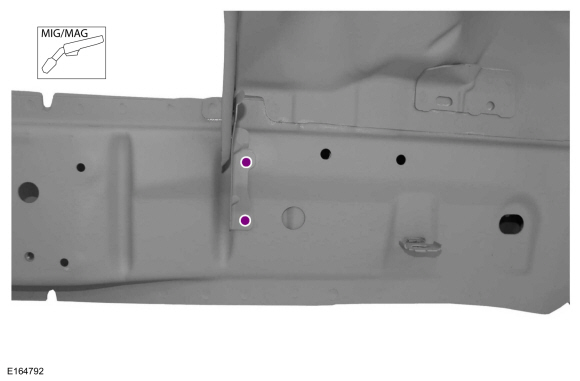
Position the bracket and install the seam weld.
Use the General Equipment: MIG/MAG Welding Equipment
 |
-
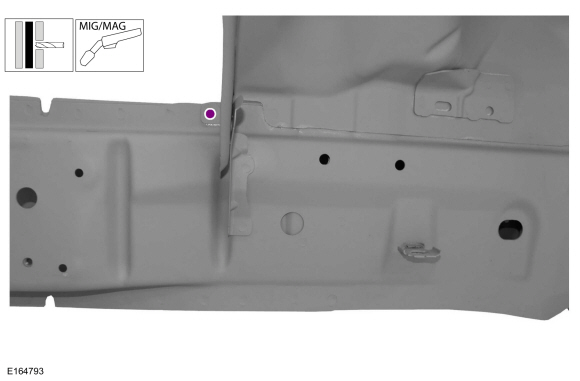
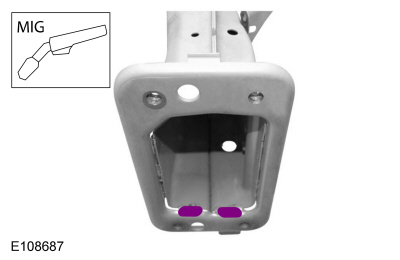
Install plug welds.
Use the General Equipment: MIG/MAG Welding Equipment
 |
-
Drill and install plug weld.
Use the General Equipment: 8 mm Drill Bit
Use the General Equipment: MIG/MAG Welding Equipment
 |
-
Stitch weld as indicated.
Use the General Equipment: MIG/MAG Welding Equipment
 |
-
Install welds.
Use the General Equipment: MIG/MAG Welding Equipment
 |
-
Metal finish the repair area using typical metal finishing techniques.
-
NOTE: Seam sealing must be restored to factory original condition.
Refinish using a Ford approved paint system.
-
Restore corrosion protection.
Refer to: Corrosion Prevention (501-25 Body Repairs - General Information, General Procedures).
-
Install the following items.
Refer to: Fender (501-02 Front End Body Panels, Removal and Installation).
Refer to: Front Bumper (501-19 Bumpers, Removal and Installation).
Refer to: Front Bumper Cover (501-19 Bumpers, Removal and Installation).
Refer to: Headlamp Assembly (417-01 Exterior Lighting, Removal and Installation).
Refer to: Front Fog Lamp (417-01 Exterior Lighting, Removal and Installation).
-
Install and align the hood.
Refer to: Hood Alignment (501-03 Body Closures, General Procedures).
 Front Side Member and Fender Apron Panel LH. Removal and Installation
Special Tool(s) /
General Equipment
Resistance Spotwelding Equipment
Grinder
8 mm Drill Bit
MIG/MAG Welding Equipment
Spot Weld Drill Bit
Removal
WARNING:
Before beginning any service procedure in this
section, refer to Safety Warnings in section 100-00 General Information...

Other information:
Ford Fiesta 2014 - 2019 Service Manual: Battery and Battery Charging Health and Safety Precautions. Description and Operation
WARNING: Batteries contain sulphuric acid, avoid contact with skin, eyes or clothing. Wear safety goggles when working near the battery to protect against possible splashing of the acid solution. WARNING: EYE CONTACT: If acid comes into contact with the eyes, flush immediately with plenty of running water for a minimum of 15 minutes. Seek immediate medical ..
Ford Fiesta 2014 - 2019 Service Manual: Rear Seatbelt Retractor - 5-Door. Removal and Installation
Removal NOTE: Removal steps in this procedure may contain installation details. Remove the upper C-pillar trim panel. Refer to: C-Pillar Upper Trim Panel - 5-Door (501-05 Interior Trim and Ornamentation, Removal and Installation). Detach the weatherstrip and position aside. Release the retainers and remo..
Categories
- Manuals Home
- Ford Fiesta Service Manual (2014 - 2019)
- Valve Clearance Adjustment. General Procedures
- Maintenance Schedules - Gasoline Engines. Description and Operation
- Engine System - General Information
- Engine
- Engine Cooling - 1.6L EcoBoost (132kW/180PS) – Sigma
Front Strut and Spring Assembly. Removal and Installation
Removal
NOTE: Removal steps in this procedure may contain installation details.
NOTE: This step is only necessary when installing a new component to the left-hand side.
Remove the nuts and position aside the remote brake fluid reservoir.Torque: 62 lb.in (7 Nm)
 Remove the strut and spring assembly upper mount nuts.
 Torque: 22 lb.ft (30 Nm)
