Ford Fiesta: Engine - 1.6L EcoBoost (132kW/180PS) – Sigma / Valve Cover. Removal and Installation
Special Tool(s) / General Equipment
| Hot Air Gun | |
| Hose Clamp Remover/Installer |
Materials
| Name | Specification |
|---|---|
| Flange Sealant CU7Z-19B508-A |
WSS-M2G348-A11 |
| Motorcraft® Metal Surface Prep Wipes ZC-31-B |
- |
| Engine Oil - SAE 5W-20 - Synthetic Blend Motor Oil XO-5W20-Q1SP |
WSS-M2C945-B1 |
Removal
Valve Cover Only
-
Remove the fuel rail.
Refer to: Fuel Rail (303-04B Fuel Charging and Controls - 1.6L EcoBoost (132kW/180PS) – Sigma, Removal and Installation).
-
-
Disconnect the electrical connector.
-
Loosen the clamp and remove the hose.
Use the General Equipment: Hose Clamp Remover/Installer
-
Disconnect the electrical connector.
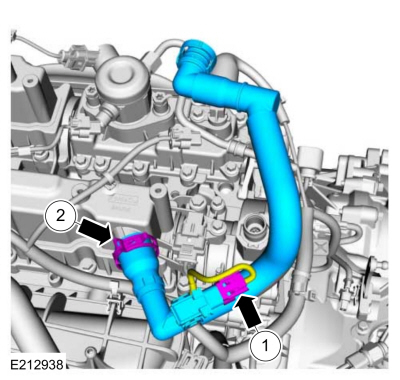 |
-
-
Disconnect the hose couplings, detach the retainer and remove the hoses.
Use the General Equipment: Hose Clamp Remover/Installer
-
Remove the oil level indicator.
-
Disconnect the electrical connector, remove the bolt and the CMP sensor.
-
Disconnect the hose couplings, detach the retainer and remove the hoses.
 |
-
NOTE: Note the position of the components before removal.
-
Disconnect the electrical connectors.
-
Remove the bolts and the VCT oil control solenoid.
-
Disconnect the electrical connectors.
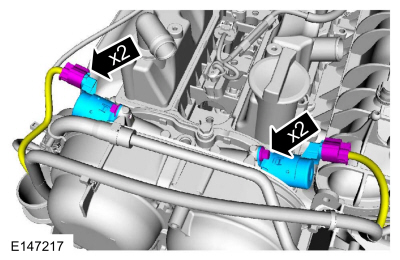 |
-
NOTE: The O-ring seals are to be reused unless damaged.
Inspect the VCT oil control solenoid O-ring seal.
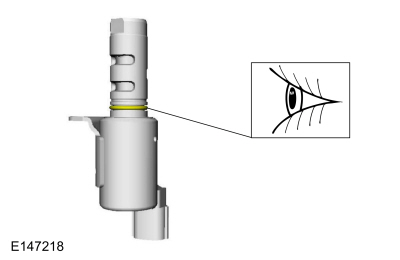 |
-
NOTE: Do not set the valve cover sealing surface face down on a bench as the check valve and splitter leg is susceptible to breakage.
Remove the bolts and the valve cover.
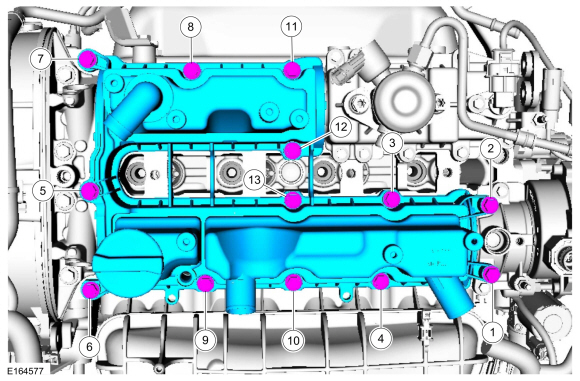 |
-
Remove and discard the valve cover gasket.
 |
Fuel Pump and Brake Vacuum Pump Mounting Brackets
-
Remove the following items:
-
Remove the fuel pump.
Refer to: Fuel Pump (303-04B Fuel Charging and Controls - 1.6L EcoBoost (132kW/180PS) – Sigma, Removal and Installation).
-
Remove the brake vacuum pump.
Refer to: Brake Vacuum Pump - 1.6L EcoBoost (132kW/180PS) – Sigma (206-07 Power Brake Actuation, Removal and Installation).
-
Remove the fuel pump.
-
-
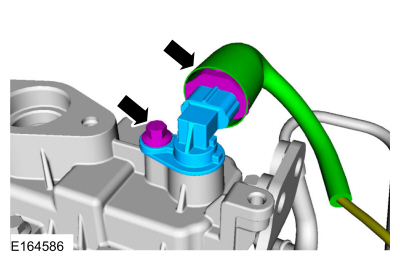
Slide the protective cover outward and disconnect the electrical connector.
-
Remove the bolt and the CMP sensor.
-
Slide the protective cover outward and disconnect the electrical connector.
 |
-
NOTICE: Use a heat gun to soften the flange sealant, this will aid in the removal of the fuel pump mounting bracket. Failure to follow these directions may result in damage to the fuel pump mounting bracket.
-
Remove the fuel pump bracket bolts in sequence shown. Heat and break the adhesive bond.
Use the General Equipment: Hot Air Gun
-
Remove the fuel pump bracket.
-
Remove and discard the O-ring seal.
-
Remove the fuel pump bracket bolts in sequence shown. Heat and break the adhesive bond.
 |
-
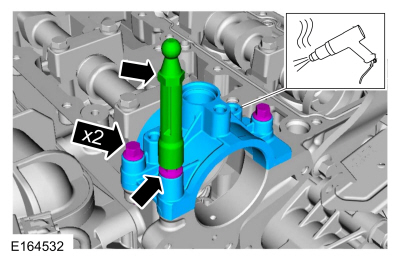
NOTICE: Use a heat gun to soften the flange sealant, this will aid in the removal of the brake vacuum pump mounting bracket. Failure to follow these directions may result in damage to the brake vacuum pump mounting bracket.
-
Remove the engine cover mounting stud.
-
Remove the bolts and the stud.
-
Heat and break the adhesive bond and remove the brake vacuum pump cap.
Use the General Equipment: Hot Air Gun
-
Remove the engine cover mounting stud.
 |
Installation
Fuel Pump and Brake Vacuum Pump Mounting Brackets
-
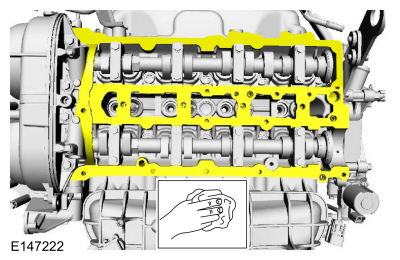
NOTICE: Do not use metal scrapers, wire brushes, power abrasive discs or other abrasive means to clean the sealing surfaces. These tools cause scratches and gouges which make leak paths.
Make sure that the mating faces are clean and free of foreign material.
Material: Motorcraft® Metal Surface Prep Wipes / ZC-31-B
 |
-
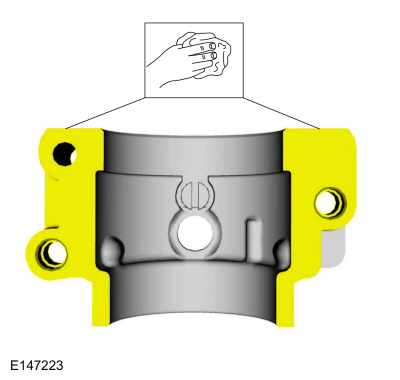
NOTICE: Do not use metal scrapers, wire brushes, power abrasive discs or other abrasive means to clean the sealing surfaces. These tools cause scratches and gouges which make leak paths.
Make sure that the mating faces are clean and free of foreign material.
Material: Motorcraft® Metal Surface Prep Wipes / ZC-31-B
 |
-
NOTICE: Do not use metal scrapers, wire brushes, power abrasive discs or other abrasive means to clean the sealing surfaces. These tools cause scratches and gouges which make leak paths.
Make sure that the mating faces are clean and free of foreign material.
Material: Motorcraft® Metal Surface Prep Wipes / ZC-31-B
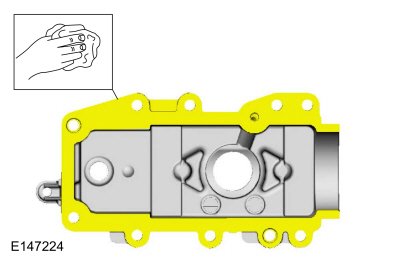 |
-
NOTE: The components must be installed within 5 minutes of applying the sealant.
Apply a 1.5 mm (0.059 in) beads of gasket maker as shown.
Material: Flange Sealant / CU7Z-19B508-A (WSS-M2G348-A11)
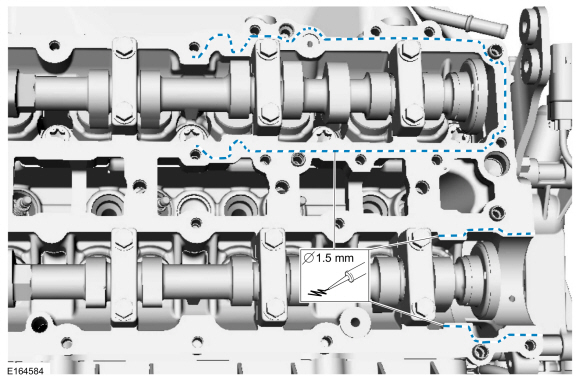 |
-
-
Install the brake vacuum pump cap, bolts and the stud.
Torque: 89 lb.in (10 Nm)
-
Install the engine cover mounting stud.
Torque: 89 lb.in (10 Nm)
-
Install the brake vacuum pump cap, bolts and the stud.
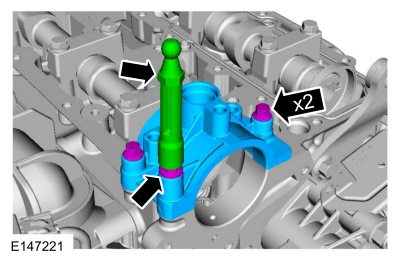 |
-
NOTE: Use a new O-ring seal.
-
Tighten the fuel pump bracket bolts in sequence shown in 4 stages.
Torque:
Stage 1: 27 lb.in (3 Nm)
Stage 2: 80 lb.in (9 Nm)
Stage 3: 97 lb.in (11 Nm)
Stage 4: Tighten bolts 1, 2, 5, 6, 7, 8, 9 and 10 to:: 124 lb.in (14 Nm)
 |
-
-
Install the CMP sensor and the bolt.
Torque: 80 lb.in (9 Nm)
-
Connect the electrical connector and slide the protective cover onto connector.
-
Install the CMP sensor and the bolt.
 |
-
Install the following items:
-
Install the brake vacuum pump.
Refer to: Brake Vacuum Pump - 1.6L EcoBoost (132kW/180PS) – Sigma (206-07 Power Brake Actuation, Removal and Installation).
-
Install the fuel pump.
Refer to: Fuel Pump (303-04B Fuel Charging and Controls - 1.6L EcoBoost (132kW/180PS) – Sigma, Removal and Installation).
-
Install the brake vacuum pump.
Valve Cover Only
-
NOTICE: Do not use metal scrapers, wire brushes, power abrasive discs or other abrasive means to clean the sealing surfaces. These tools cause scratches and gouges which make leak paths.
NOTE: Clean if replacing the valve cover gasket only.
Make sure that the mating faces are clean and free of foreign material.
Material: Motorcraft® Metal Surface Prep Wipes / ZC-31-B
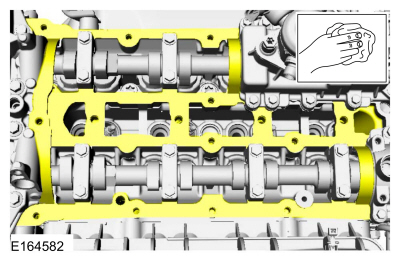 |
-
Install the new valve cover gasket.
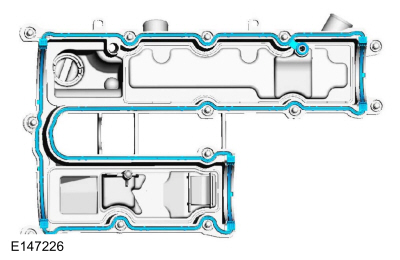 |
-
NOTE: The components must be installed within 5 minutes of applying the sealant.
Apply a 1.5 mm (0.059 in) beads of gasket maker as shown.
Material: Flange Sealant / CU7Z-19B508-A (WSS-M2G348-A11)
 |
-
Apply a 1.5 mm (0.059 in) beads of gasket maker as shown.
Material: Flange Sealant / CU7Z-19B508-A (WSS-M2G348-A11)
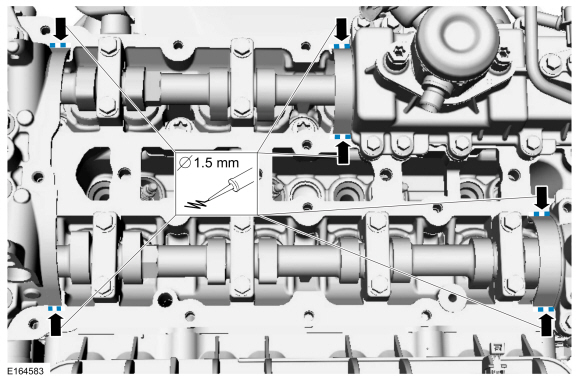 |
-
Install the valve cover and the bolts in sequence shown in 3 stages.
Torque:
Stage 1: 44 lb.in (5 Nm)
Stage 2: 80 lb.in (9 Nm)
Stage 3: 89 lb.in (10 Nm)
 |
-
NOTE: The O-ring seals are to be reused unless damaged.
Lubricate the VCT oil control solenoid O-ring seal.
Material: Engine Oil - SAE 5W-20 - Synthetic Blend Motor Oil / XO-5W20-Q1SP (WSS-M2C945-B1)
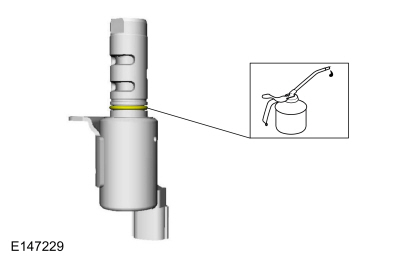 |
-
Install the VCT oil control solenoids, bolts and connect the electrical connectors.
Torque: 71 lb.in (8 Nm)
 |
-
-
Install the PCV hose, connect the couplings and attach the retainer.
-
Install the oil level indicator. Connect the breather hose.
Use the General Equipment: Hose Clamp Remover/Installer
-
Install the CMP sensor and the bolt. Connect the electrical connector.
Torque: 80 lb.in (9 Nm)
-
Install the PCV hose, connect the couplings and attach the retainer.
 |
-
-
Install the PCV hose and the clamp.
Use the General Equipment: Hose Clamp Remover/Installer
-
If equipped.
Connect the electrical connector.
-
Install the PCV hose and the clamp.
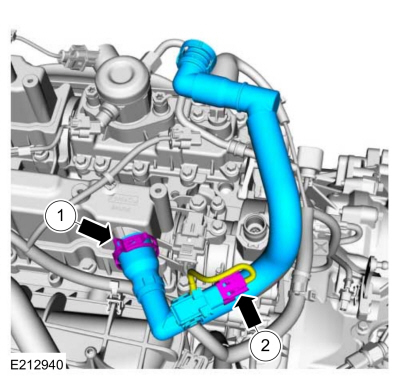 |
-
Install the fuel rail.
Refer to: Fuel Rail (303-04B Fuel Charging and Controls - 1.6L EcoBoost (132kW/180PS) – Sigma, Removal and Installation).
 Variable Camshaft Timing (VCT) Unit. Removal and Installation
Special Tool(s) /
General Equipment
303-1097Locking Tool, Variable Camshaft Timing Oil Control UnitTKIT-2010B-FLMTKIT-2010B-ROW
303-1552Alignment Tool, CamshaftTKIT-2012A-FLTKIT-2012A-ROW
Removal
NOTICE:
Do not loosen or remove the crankshaft pulley bolt without
first installing the special tools...
Other information:
Ford Fiesta 2014 - 2019 Service Manual: Transport and Factory Mode Deactivation. General Procedures
Deactivation Place the ignition in the OFF position. Verify the battery is fully charged. Refer to: Battery (414-01 Battery, Mounting and Cables, Diagnosis and Testing). Place the ignition in the ON position...
Ford Fiesta 2014 - 2019 Service Manual: Intake Air Temperature (IAT) Sensor. Removal and Installation
Removal NOTE: Removal steps in this procedure may contain installation details. Disconnect the electrical connector, remove the retainers and the IAT sensor. Torque: 44 lb.in (5 Nm) Installation To install, reverse the removal procedure...
Categories
- Manuals Home
- Ford Fiesta Service Manual (2014 - 2019)
- General Information
- Timing Belt. Removal and Installation
- Engine - 1.6L EcoBoost (132kW/180PS) – Sigma
- Engine Cooling - 1.6L EcoBoost (132kW/180PS) – Sigma
- Engine System - General Information
Brake Backing Plate. Removal and Installation
Removal
NOTE: Removal steps in this procedure may contain installation details.
Remove the brake shoes.Refer to: Brake Shoes (206-02 Drum Brake, Removal and Installation).
Disconnect the brake tube fitting.
Torque: 159 lb.in (18 Nm) Remove the bolt and wheel cylinder.
Torque: 106 lb.in (12 Nm)
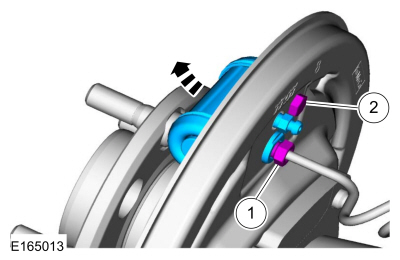 Disconnect the brake shoe lever fitting and re

