Ford Fiesta: Rear End Sheet Metal Repairs / Quarter Panel LH - 5-Door. Removal and Installation
Ford Fiesta 2014 - 2019 Service Manual / Body and Paint / Rear End Sheet Metal Repairs / Quarter Panel LH - 5-Door. Removal and Installation
Special Tool(s) / General Equipment
| Resistance Spotwelding Equipment | |
| Hot Air Gun | |
| Air Body Saw | |
| MIG/MAG Welding Equipment | |
| Spot Weld Drill Bit |
Materials
| Name | Specification |
|---|---|
| Metal Bonding Adhesive TA-1, TA-1-B, 3M™ 08115, LORD Fusor® 108B, Henkel Teroson EP 5055 |
- |
| Seam Sealer TA-2-B, 3M™ 08308, LORD Fusor® 803DTM |
- |
Removal
-
Follow the health and safety precautions. WARNING:
Before beginning any service procedure in this
section, refer to Safety Warnings in section 100-00 General Information.
Failure to follow this instruction may result in serious personal
injury.
WARNING:
Before beginning any service procedure in this
section, refer to Safety Warnings in section 100-00 General Information.
Failure to follow this instruction may result in serious personal
injury.
Refer to: Body Repair Health and Safety and General Precautions (100-00 General Information, Description and Operation).
-
For vehicle dimensional information:
Refer to: Body and Frame (501-26 Body Repairs - Vehicle Specific Information and Tolerance Checks, Description and Operation).
-
Remove the following items.
Refer to: Rocker Panel Moulding (501-08 Exterior Trim and Ornamentation, Removal and Installation).
Refer to: Rear Door (501-03 Body Closures, Removal and Installation).
Refer to: Rear Bumper (501-19 Bumpers, Removal and Installation).
Refer to: C-Pillar Upper Trim Panel - 5-Door (501-05 Interior Trim and Ornamentation, Removal and Installation).
Refer to: Liftgate (501-03 Body Closures, Removal and Installation).
Refer to: Rear Lamp Assembly (417-01 Exterior Lighting, Removal and Installation).
Refer to: Rear Quarter Window Glass - 5-Door (501-11 Glass, Frames and Mechanisms, Removal and Installation).
Refer to: Loadspace Trim Panel - 5-Door (501-05 Interior Trim and Ornamentation, Removal and Installation).
Refer to: Rear Seat Cushion (501-10 Seating, Removal and Installation).
-
Reposition the carpeting and wiring harness away from the working area.
-
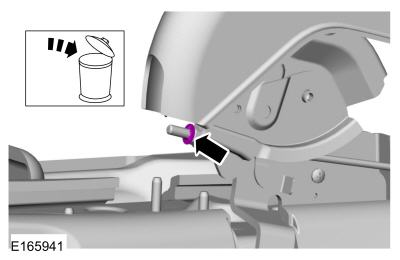
Drill out the spot welds and carefully measure and cut the outer panel only as indicated.
Use the General Equipment: Air Body Saw
Use the General Equipment: Spot Weld Drill Bit
 |
-
Drill out the spot welds.
Use the General Equipment: Spot Weld Drill Bit
 |
-
Drill out the spot welds and carefully cut the outer panel only as indicated.
Use the General Equipment: Spot Weld Drill Bit
Use the General Equipment: Air Body Saw
 |
-
Break the adhesive bond and remove the quarter panel section.
Use the General Equipment: Hot Air Gun
 |
Installation
-
Carefully measure and cut the replacement panel to fit repair area.
Use the General Equipment: Air Body Saw
-
Drill plug welds holes in replacement panel.
 |
-
Apply metal bonding adhesive.
Material: Metal Bonding Adhesive / TA-1, TA-1-B, 3M™ 08115, LORD Fusor® 108B, Henkel Teroson EP 5055
 |
-
Install the replacement panel and spot welds.
Use the General Equipment: Resistance Spotwelding Equipment
 |
-
Install the seam and plug welds.
Use the General Equipment: MIG/MAG Welding Equipment
 |
-
Install the plug welds.
Use the General Equipment: MIG/MAG Welding Equipment
 |
-
Install the seam and spot welds.
Use the General Equipment: MIG/MAG Welding Equipment
Use the General Equipment: Resistance Spotwelding Equipment
 |
-
Metal finish as required using typical metal finishing techniques.
-
Sealing work: All areas must be sealed to production level.
Material: Seam Sealer / TA-2-B, 3M™ 08308, LORD Fusor® 803DTM
-
Refinish using a Ford approved paint system.
-
Restore corrosion protection.
Refer to: Corrosion Prevention (501-25 Body Repairs - General Information, General Procedures).
-
Reposition the carpeting and wiring harness.
-
Install the following items.
Refer to: Rocker Panel Moulding (501-08 Exterior Trim and Ornamentation, Removal and Installation).
Refer to: Rear Door (501-03 Body Closures, Removal and Installation).
Refer to: Rear Bumper (501-19 Bumpers, Removal and Installation).
Refer to: C-Pillar Upper Trim Panel - 5-Door (501-05 Interior Trim and Ornamentation, Removal and Installation).
Refer to: Liftgate (501-03 Body Closures, Removal and Installation).
Refer to: Rear Lamp Assembly (417-01 Exterior Lighting, Removal and Installation).
Refer to: Rear Quarter Window Glass - 5-Door (501-11 Glass, Frames and Mechanisms, Removal and Installation).
Refer to: Loadspace Trim Panel - 5-Door (501-05 Interior Trim and Ornamentation, Removal and Installation).
Refer to: Rear Seat Cushion (501-10 Seating, Removal and Installation).

 Water Drain Panel - 5-Door. Removal and Installation
Special Tool(s) /
General Equipment
Resistance Spotwelding Equipment
Air Body Saw
8 mm Drill Bit
MIG/MAG Welding Equipment
Spot Weld Drill Bit
Locking Pliers
Materials
Name
Specification
Seam SealerTA-2-B, 3M™ 08308, LORD Fusor® 803DTM
-
Removal
WARNING:
Before beginning any servi..
Other information:
Ford Fiesta 2014 - 2019 Service Manual: Information and Entertainment System - System Operation and Component Description. Description and Operation
System Operation System Diagram Network Message Chart A missing network message is indicated by a U-code DTC and can be the result of intermittent concerns such as damaged wiring or low battery voltage occurrences. Additionally, vehicle repair procedures such as module reprogramming can set these Diagnostic Trouble Codes (DTCs). When a missing message DTC (U-code)..
Ford Fiesta 2014 - 2019 Service Manual: Communications Network - Overview. Description and Operation
Overview Multiplexing is a method of sending 2 or more signals simultaneously over a single circuit. Multiplexing allows 2 or more electronic modules (nodes) to communicate over a twisted wire pair [data (+) and data (-)] network. The information or messages that can be communicated on these wires consists of commands, status or data. The advantage of using multiplexing is to reduce ..
Categories
- Manuals Home
- Ford Fiesta Service Manual (2014 - 2019)
- Engine
- Body Control Module (BCM). Removal and Installation
- Valve Clearance Adjustment. General Procedures
- Engine System - General Information
- Timing Belt. Removal and Installation
Parking Brake Control. Removal and Installation
Removal
NOTE: Removal steps in this procedure may contain installation details.
Remove the floor console.Refer to: Floor Console (501-12 Instrument Panel and Console, Removal and Installation).
Remove the driver seat.
Refer to: Front Seat (501-10 Seating, Removal and Installation).
Remove the parking brake cable adjustment lock nut.
 Loosen the parking brake cable adjustment nut.
Copyright © 2025 www.fofiesta7.com